More IPv6 Windows netsh Commands

In a continuation of my recent IPv6 blog post regarding netsh How to enable IPv6 addresses on your Windows box using netsh, I have a couple more commands to share that I find useful. If you are a networking professional and you are migrating to IPv6 (even if at a snail’s pace), it is helpful to know some Windows commands to complement your Cisco command knowledge.
My previous blog discussed how to put an IPv6 address on a network interface on a Windows box. If you got that far, pat yourself on the back. However, within moments you realize that the IPv6 address alone is not sufficient – you are going to need a bit more. As in IPv4, an IP endpoint cannot communicate outside of its local network without a default gateway. So today we are going to explore how to add a default gateway to your Windows box.
First I will re-add the same address that I used in my previous blog on the topic, shown below:

Figure 1
Now let’s examine the IPv6 routing table on this box using the command route print -6:
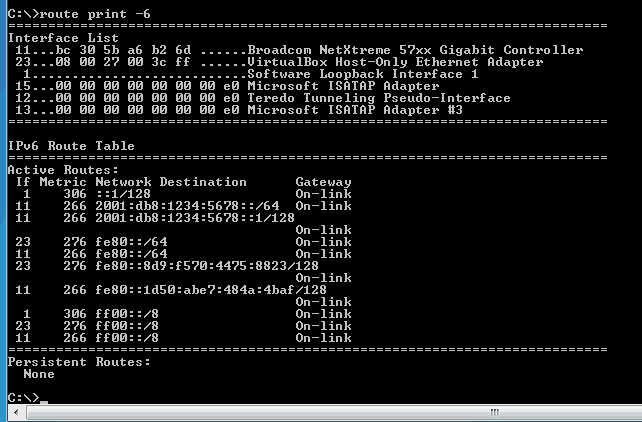
Figure 2
This just demonstrates that there is no default route (and therefore no default gateway) for our IPv6 network. Let’s correct this oversight:

Figure 3
Since I added a default gateway, let’s examine the IPv6 routing table again:
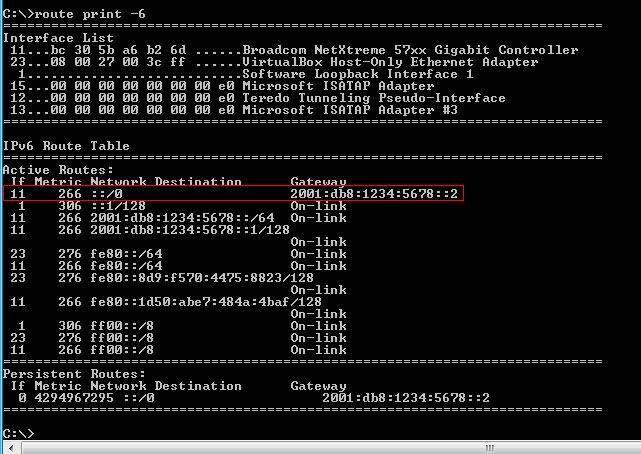
Figure 4
Now you can see that there is a default route present. Oddly enough, since most commands in IPv6 contain more characters than their IPv4 counterparts, I like to point out that this is one that is actually shorter – at least within the Cisco IOS. The default route syntax in IOS for IPV4 looks like this 0.0.0.0 0.0.0.0, whereas the default route in IOS for IPv6 looks like this: ::/0
It’s not a giant silver lining, but every little bit helps.
So there you have it. Once you have added an IPv6 address to an interface, the next step is to tell your endpoint where to send everything that is not in the same network. This logic is exactly the same as what you would do in IPv4, but it is helpful to be reminded of the similarities so that IPv6 doesn’t seem like such a beast. If you have suggestions or comments, I would love to hear them!
Until next time….
Mark Jacob
Cisco and CompTIA Network + Instructor – Interface Technical Training
Phoenix, AZ


A Simple Introduction to Cisco CML2
Mark Jacob, Cisco Instructor, presents an introduction to Cisco Modeling Labs 2.0 or CML2.0, an upgrade to Cisco’s VIRL Personal Edition. Mark demonstrates Terminal Emulator access to console, as well as console access from within the CML2.0 product. Hello, I’m Mark Jacob, a Cisco Instructor and Network Instructor at Interface Technical Training. I’ve been using … Continue reading A Simple Introduction to Cisco CML2
Creating Dynamic DNS in Network Environments
This content is from our CompTIA Network + Video Certification Training Course. Start training today! In this video, CompTIA Network + instructor Rick Trader teaches how to create Dynamic DNS zones in Network Environments. Video Transcription: Now that we’ve installed DNS, we’ve created our DNS zones, the next step is now, how do we produce those … Continue reading Creating Dynamic DNS in Network Environments
Cable Testers and How to Use them in Network Environments
This content is from our CompTIA Network + Video Certification Training Course. Start training today! In this video, CompTIA Network + instructor Rick Trader demonstrates how to use cable testers in network environments. Let’s look at some tools that we can use to test our different cables in our environment. Cable Testers Properly Wired Connectivity … Continue reading Cable Testers and How to Use them in Network Environments