Checking and Changing Adobe Flash Camera and Mic Settings in Windows

Adobe Flash gets used for a ton of web-based media applications, from game streaming to web conferences to online training courses. Here at Interface we use a Flash-based application called Adobe Connect for our remote student connections. Even though HTML5 and other emerging and growing technologies are quite popular, Adobe Flash does seem to be here for the long-haul.
With all these apps using Flash, Adobe needed to give the user and IT administrator some control over security and privacy. But few users know where these settings are located and how to modify them. This blog shows you where the most commonly-changed settings, the camera and microphone settings, are located and how to change them.
Finding the Adobe Flash Player Settings Manager
All of the relevant Flash settings are stored in the Adobe Flash Player Settings Manager. To get there, first fire up Control Panel as shown in Figure 1. Note that I’m using Windows 7 for these screenshots, but the same process (with minor visual changes) applies to Windows Vista, Windows 8, Windows Server 2008 and Windows Server 2012.
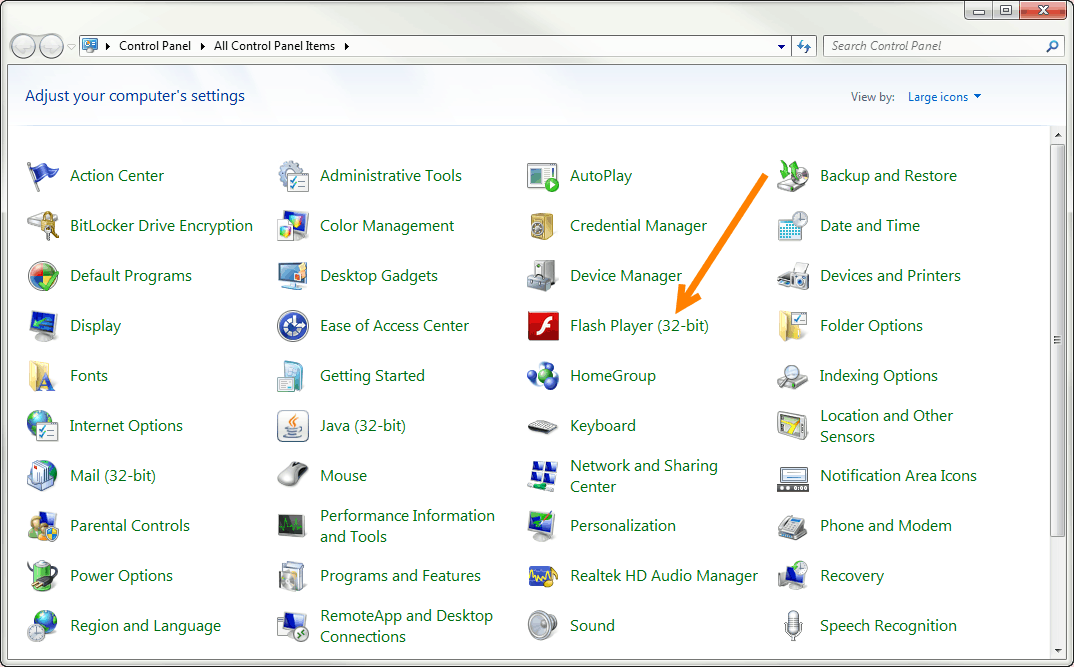
Figure 1. Control Panel.
Next, click on the Flash Player icon that I’ve pointed out. You’ll see the Flash Player Settings Manager. Click on the Camera and Mic tab as shown in Figure 2.
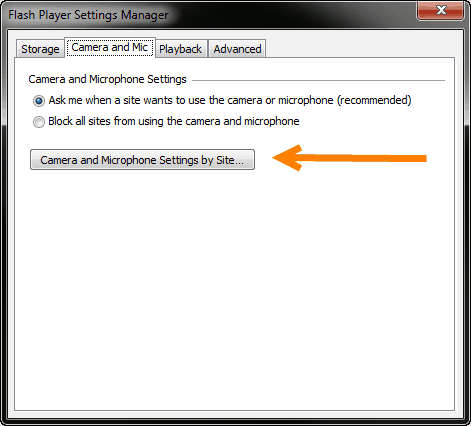
Figure 2. The Camera and Mic settings tab.
If the Block all sites radio button is selected, well, that has a pretty obvious effect. Adobe Flash cannot use any local camera or microphone on the system. The default is Ask me when a site wants to use the camera or microphone, which should prompt the user for permission. Clicking on the highlighted Camera and Microphone Settings by Site button allows you to view and configure the trusted sites as shown in Figure 3.

Figure 3. The sites that are specifically denied, allowed, or configured to prompt for camera and microphone access.
To ensure that a site can use the camera and microphone through Adobe Flash, click the Add button. That will let you add camera and microphone settings by site as shown in Figure 4. In this example I’m explicitly allowing remotelive.interfacett.com to use the camera and microphone.
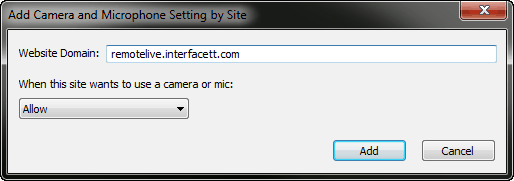
Figure 4. Add Camera and Microphone Setting by Site.
That’s all it takes to ensure that a site can use the camera and microphone with Adobe Flash!
Special Note on Group Policy
In most environments the procedure I’ve documented works as described. However, in some scenarios the options may not be user-configurable. That’s most common in corporate environments where IT security policy is in place to explicitly disable these resources. This is typically deployed with Group Policy on domain-joined computers, but really any policy or configuration management software can disable Adobe Flash settings. In those cases, you’ll need to contact the IT department. If you are the IT department, you’ll need to determine which policy is making the configuration change and modify it to suit your needs.
Enjoy,
Mike Danseglio -CISSP / CEH
Interface Technical Training – Technical Director and Instructor


A Simple Introduction to Cisco CML2
Mark Jacob, Cisco Instructor, presents an introduction to Cisco Modeling Labs 2.0 or CML2.0, an upgrade to Cisco’s VIRL Personal Edition. Mark demonstrates Terminal Emulator access to console, as well as console access from within the CML2.0 product. Hello, I’m Mark Jacob, a Cisco Instructor and Network Instructor at Interface Technical Training. I’ve been using … Continue reading A Simple Introduction to Cisco CML2
Cable Testers and How to Use them in Network Environments
This content is from our CompTIA Network + Video Certification Training Course. Start training today! In this video, CompTIA Network + instructor Rick Trader demonstrates how to use cable testers in network environments. Let’s look at some tools that we can use to test our different cables in our environment. Cable Testers Properly Wired Connectivity … Continue reading Cable Testers and How to Use them in Network Environments
Understanding Latency in Troubleshooting Network Connectivity
This content is from our CompTIA Network + Video Certification Training Course. Start training today! Every one of us has experienced latency. Think about it, you’re on the internet streaming a video on YouTube and one second, the person of on the right of the screen then in the next consecutive second, the person have … Continue reading Understanding Latency in Troubleshooting Network Connectivity