Configuring Content Deployment for a Team Site in SharePoint 2010

I am often asked about deploying content from a testing or development environment into production in SharePoint 2010. There are several ways to do this and depending on the situation one might be a better choice than another. For example a developer might take a .wsp and hand it off to a Farm Administrator or if it's a sand boxed solution might upload it to a place where Site Collection Administrators can access it and deploy it themselves.
In this blog I will deploy a team site that I have developed in a staging or prototyping site collection to a site collection I will use for testing.
In this situation both site collections will be in the same web application.
I will create the site collections at the url's http://intranet.jason.local/blogs/staging and http://intranet.jason.local/blogs/production. Before I create the production site collection I will create a new Content Database in the http://intranet.jason.local:80 web application so that when I create the production site collection it will be in a different content database than the staging one. I have tried to do it before with both site collections in the same content database and it's always given me errors, so I always put them in different site collections.
In this example I will use a Team Site Template where the Publishing Feature is not enabled.
In order to complete this blog I needed to be in the Farm Administrators Group and have access to Central Administration.
The steps will take are:
- Configure Content Deployment Settings
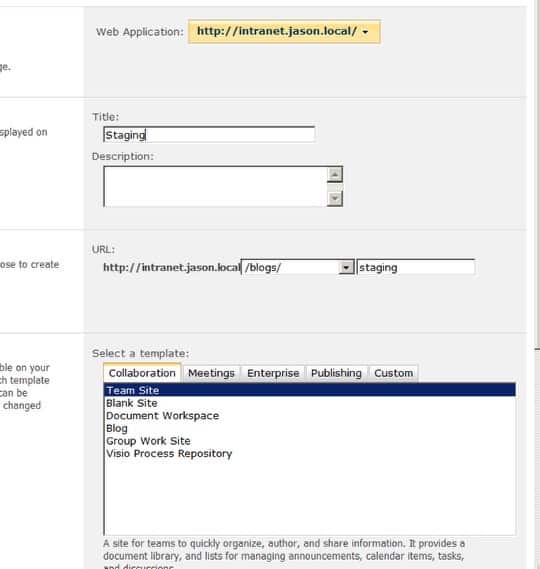
- Create the staging site collection using a team site template for the top level site of the site collection.
- Create a new content database in the http://intranet.jason.local:80 web application called WSS_Content_Production
- Create the production site collection and "Choose Template Later", making sure it's in the new content database.
- Configure Content Deployment Path.
- Configure Content Deployment Job.
- Test the Content Deployment Job.
It is pretty easy to accidentally fat-finger some of the configuration settings so I try to take my time when setting this up. I always double check to make sure that the two site collections are in different content databases.
NOTE: To do this blog, I had to be in the Farm Administrators group with access to Central Administration. Also, the URL's in this blog only work on my local farm so they won't work in another environment (notice the .local address) I know this is a bit MOTO (master of the obvious) but sometimes people get confused on this stuff.
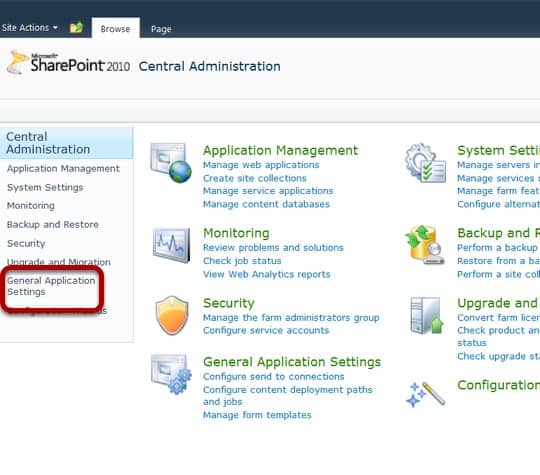
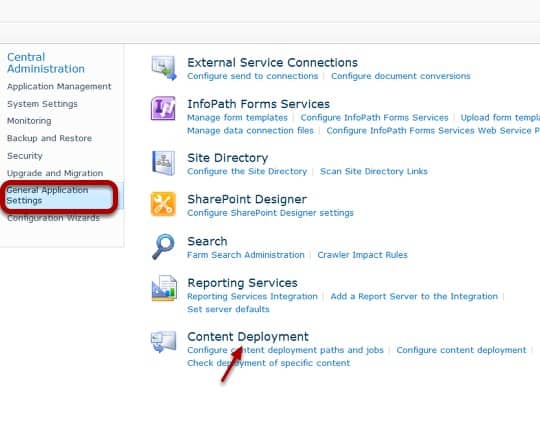
Go to Central Administration General Application Settings
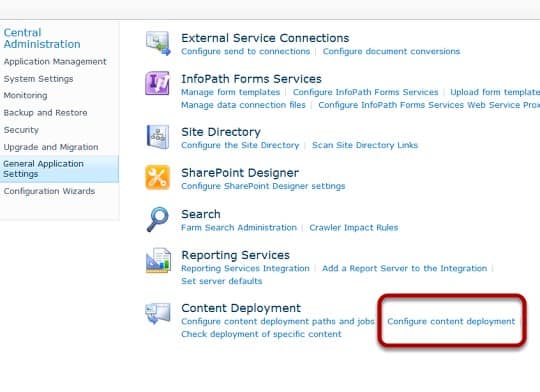
Configure Content Deployment
Adjust Settings As-Needed
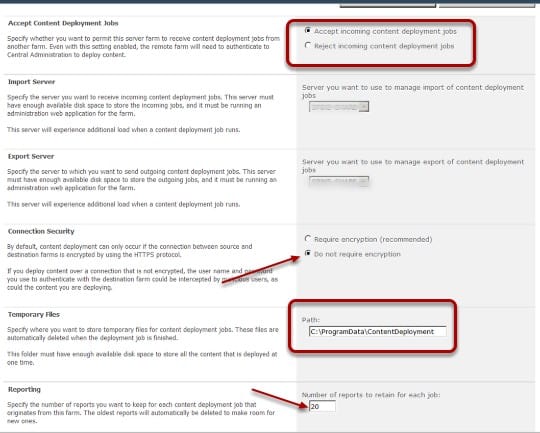
This is where you configure the farm to accept incoming connections. I'm configuring this to go from a staging site collection to a production site collection on the same server and in the same web application without encryption so these settings are fine. If pushing across other boundaries, it might become necessary to involve the Network folks. In a larger environment I would move the location away from the C drive most likely. When it's all set I click OK (Not shown)
Create Staging Site Collection
Set Team Site as Top Level Site Template
Create Production Content Database
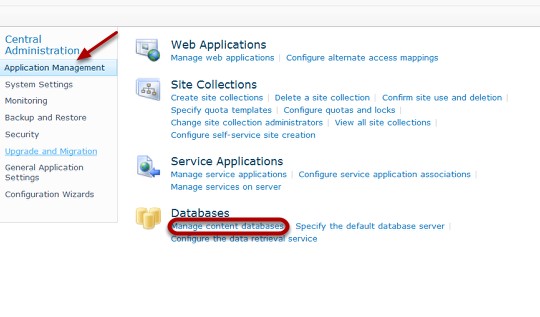
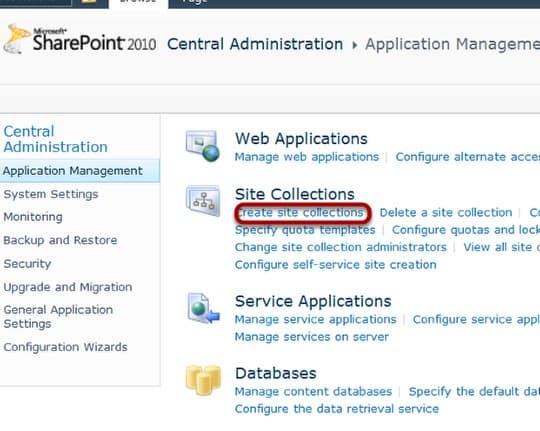
When I was finished creating the staging site collection I was taken to a page which gave the address of the finished site collection. I clicked Application Management. which took me to this page where I clicked on Manage Content Databases.
Click Add a Content Database

On the Manage Content Databases page, I make sure I'm in the correct Web Application and then I click Add a content database.
Configure the Content Database Settings
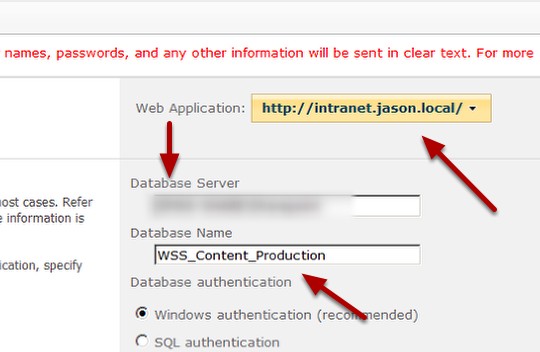
I verify the web application and change the default name and replace the GUID with _Production all the rest I leave with the defaults and click OK (not shown)
Create the Production Site Collection
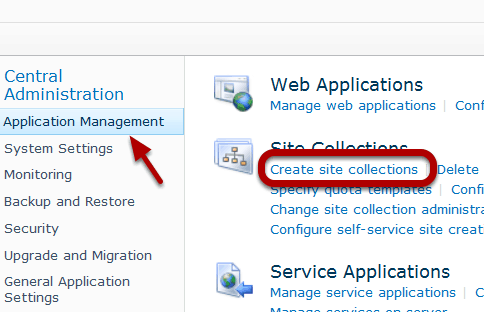
After creating the new content database I'm taken to the Manage Content Databases screen where I see my new WSS_Content_Production database listed. (Not shown) I click on Application Management in the Quick Launch and then click on Create Site Collections.
Create the Production Site Collection Choose Template Later
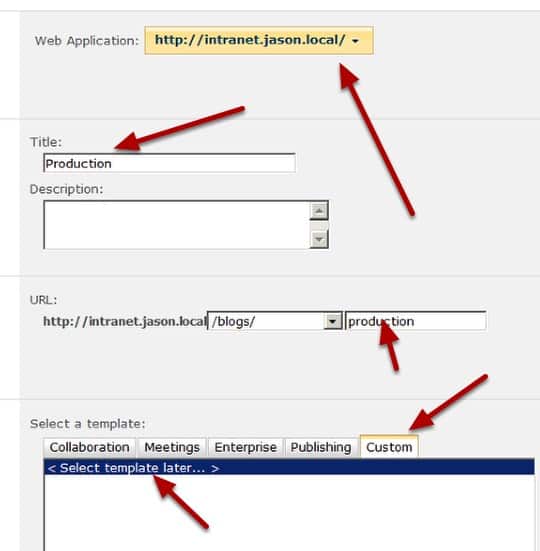
I fill out the form to create a new site collection in the web application http://intranet.jason.local and place it at the url: http://intranet.jason.local/sites/production I do not select a template for the top level site, instead I click the Custom tab and choose Select template later…
I put myself as the site collection administrator and click OK. (Not shown).
Add some tasks to Staging
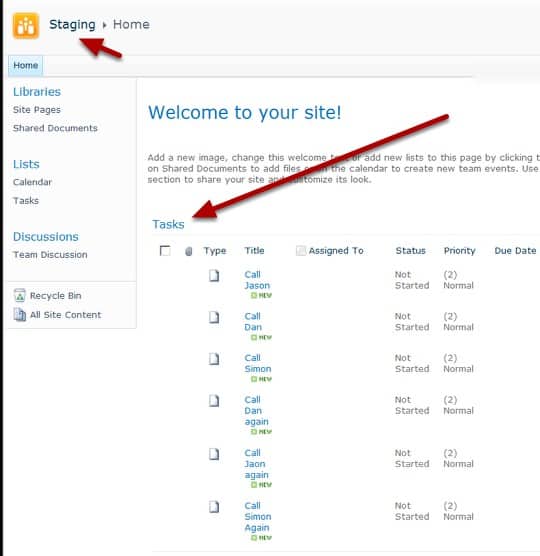
I've gone ahead and added some tasks to the staging site collection so that I can see that they push across correctly then I added a tasks list web part to the home page of the staging site.
In Central-Administration, go to General Application Settings
Configure content deployment paths and jobs
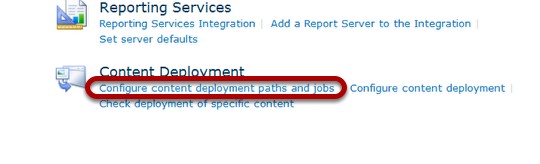
I click Configure content deployment paths and jobs.
Create New Path
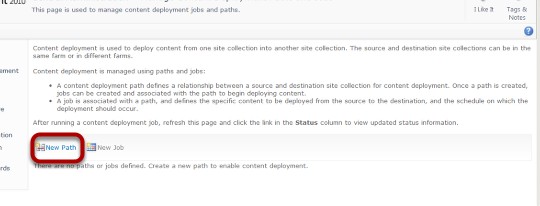
I click on New Path to create a new path. Once the path is created I can create a new job. The text above is some of the best descriptive text in SharePoint so it's a good idea to read it.
Create Connection to Central Administration
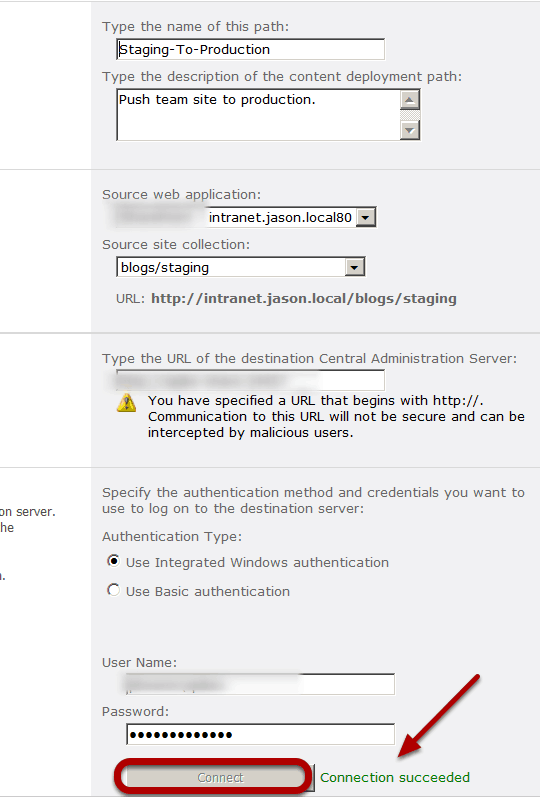
On this page I create a connection to the Central Administration website I configure all the settings for example, the Central Administration address including port number, the Source Web Application, the Source Site Collection and the URL to Central Administration where the content is going to. I add a user name and password that is available on the receiving server (since it's the same one I use the one I’m logged in with) and click Connect. If I input everything correctly I'll get a green message "Connection Succeeded". Then I can configure the rest (next step).
Configure Destination Site Collection
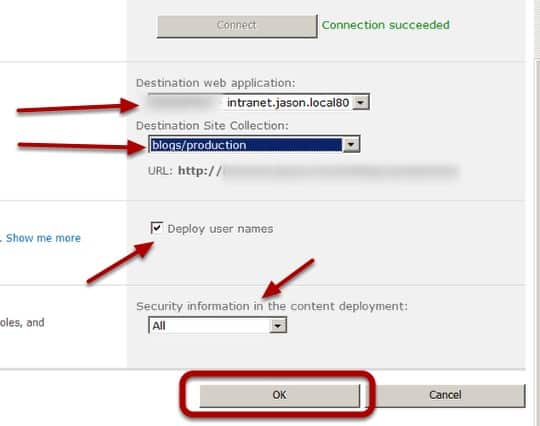
I choose the destination web application and the destination site collection. In this case i will deploy user names and Security information; however in some cases I would change these. It is situation dependent. Then I click OK.
Create a Content Deployment Job
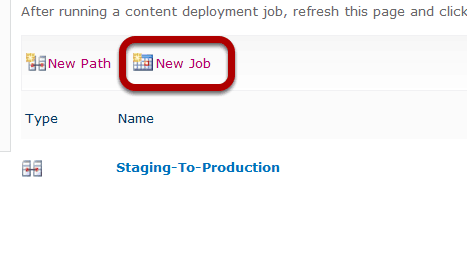
Now that I have a path, I can click on New Job. The text on this page is very informative.
Name and Configure Path
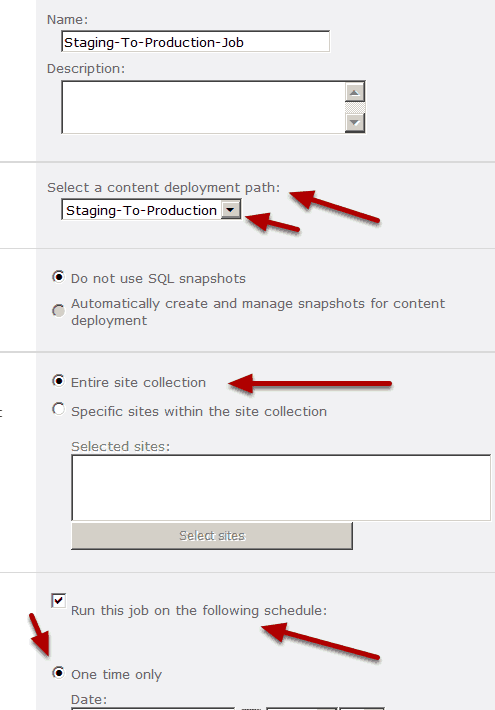
The top half has to do with the name of the Job and selecting the path. Also I can optionally configure whether or not to include the entire site collection or just a sub site, or to have status emails sent to an email address. I will make the adjustments as shown and click OK.
Run the Job
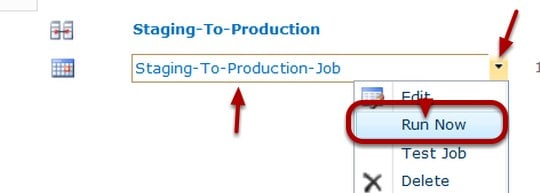
Time to Run the Job. To do this I mouse over the Job and use the ECB menu to choose Run Now. I can then monitor the Status column.
Monitor the Status Preparing

The status column will say Preparing
Monitor the Status Running
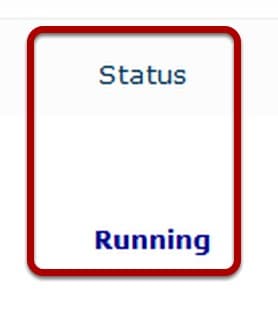
After a while if you refresh the page it will say Running (hopefully)
Monitor the Status Completed
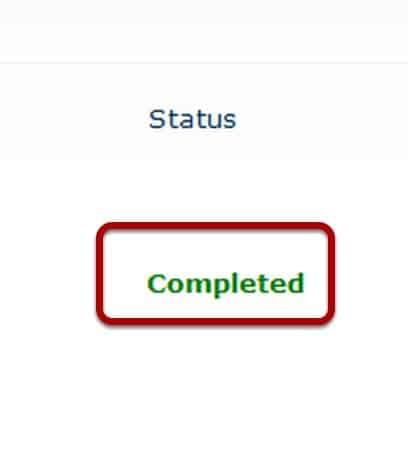
After a while I refresh the page and finally I see the green Completed. If it failed it would say Failed in Red. Luckily it's time to check the http://intranet.jason.local/blogs/production site.
Verify Content Publish
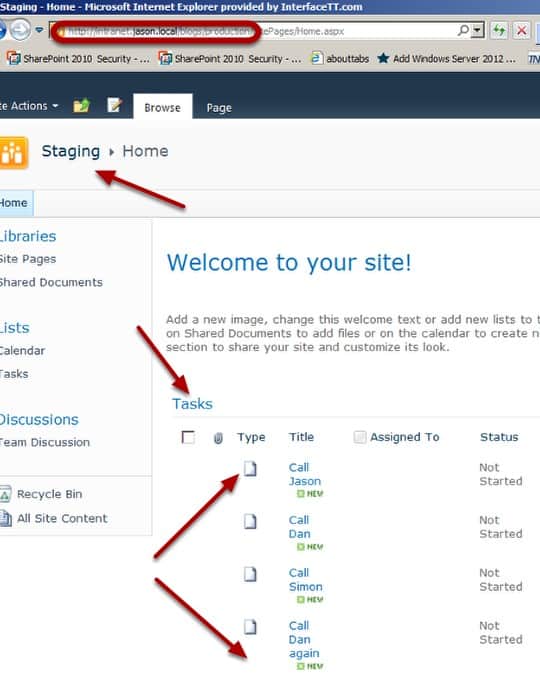
I can see that the site has been pushed into the correct URL and that the tasks have been moved over.
This is one way to set up content deployment. There are many options even within this way. It is very important that the site collections be in different content databases or this won't work. To be honest I try to be very careful when typing in all the settings because if you fat finger the log in or other settings you will get a Failed message with a bunch of errors. When this happens I sometimes just create a new Path and Job.
Enjoy,
Spike Xavier
SharePoint Instructor – Interface Technical Training
Phoenix, AZ


A Simple Introduction to Cisco CML2
Mark Jacob, Cisco Instructor, presents an introduction to Cisco Modeling Labs 2.0 or CML2.0, an upgrade to Cisco’s VIRL Personal Edition. Mark demonstrates Terminal Emulator access to console, as well as console access from within the CML2.0 product. Hello, I’m Mark Jacob, a Cisco Instructor and Network Instructor at Interface Technical Training. I’ve been using … Continue reading A Simple Introduction to Cisco CML2
Creating Dynamic DNS in Network Environments
This content is from our CompTIA Network + Video Certification Training Course. Start training today! In this video, CompTIA Network + instructor Rick Trader teaches how to create Dynamic DNS zones in Network Environments. Video Transcription: Now that we’ve installed DNS, we’ve created our DNS zones, the next step is now, how do we produce those … Continue reading Creating Dynamic DNS in Network Environments
Cable Testers and How to Use them in Network Environments
This content is from our CompTIA Network + Video Certification Training Course. Start training today! In this video, CompTIA Network + instructor Rick Trader demonstrates how to use cable testers in network environments. Let’s look at some tools that we can use to test our different cables in our environment. Cable Testers Properly Wired Connectivity … Continue reading Cable Testers and How to Use them in Network Environments