Extended ACLs on Cisco devices

If you have read my two most recent blog posts, you have seen an introduction (ACLs on Cisco devices-introduction) to standard ip access-lists – their syntax and one possible use (Understanding Wildcard Masks). I promised that I would delve more deeply into access-lists by discussing extended access-lists, so let’s get to it.
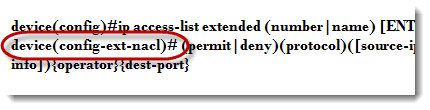
To many who are just being introduced to the world of Cisco, ACLs can be intimidating, but this is temporary. I believe the main reason for this is that the syntax can become quite lengthy, which can be overwhelming. However, if you break down the syntax into its constituent parts, this concept simplifies greatly. First, let’s examine the syntax.

Things inside parentheses are required elements. Things inside curly braces are optional. If we break this down into pieces, it is much easier to digest. The first part, ip access-list extended, is the same for each list you create. The next piece, (number|name), is where you select either a list with a number or a name. I suggest naming your lists for easy future reference. After all, two months from now, will you remember what list number 127 was supposed to accomplish? But a list named “i-hate-mark” will jump right back into your memory. Once you have selected numbered or named, hit Enter, and notice how your prompt changes.
Next, you must choose to either permit or deny the identified traffic. After that we get to the protocol. There are many options here. A quick way to see your options is to type the command into your Cisco IOS device up to this point and then use the question mark, like so:
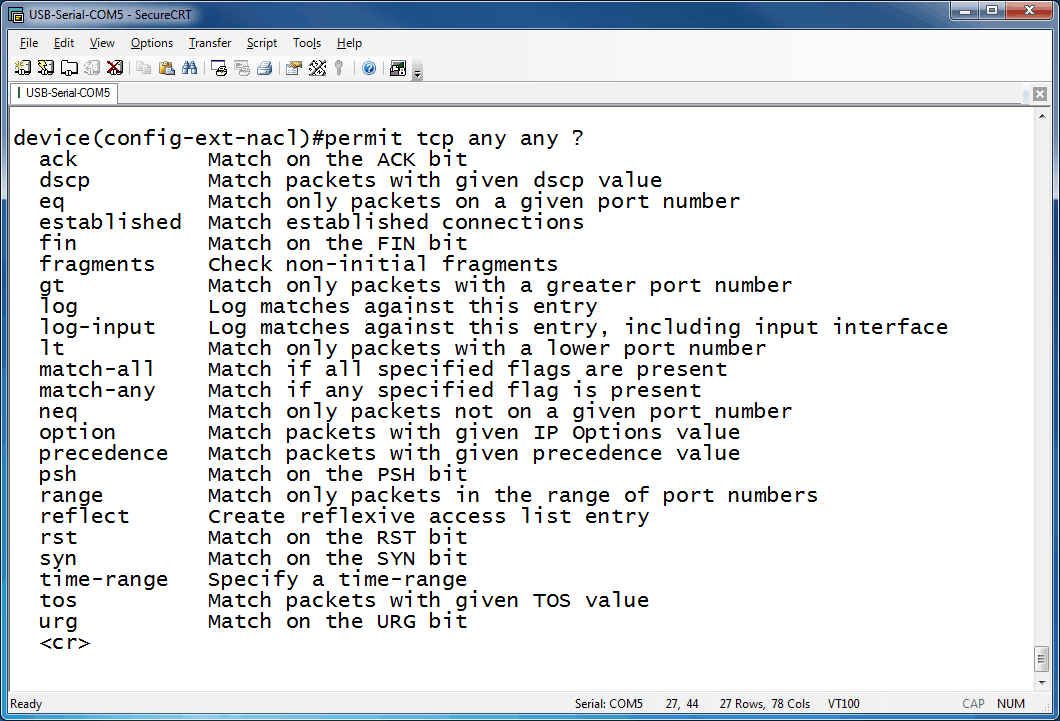
So choices abound here, but since this is an introductory blog, we will focus on the ones you will most likely use the most early in your networking career (e.g., IP, TCP, UDP). The next item in the configuration is the source information. You can use a source IP address in dotted-decimal format accompanied by a wildcard mask – also in dotted-decimal format, or if it is a specific host address, you can use the keyword “host.” You can also focus on source port information, but in general the source port information is chosen somewhat randomly by the originating OS, so filtering based on source port information is not done as often as filtering on destination ports. The destination information is much like the source information in regards to its format – dotted-decimal for the IP and the wildcard mask. There is another keyword that can be used in access-lists when you want to match ANY IP address, which is “any.” In wildcard notation, “any” looks like this: 0.0.0.0 255.255.255.255, whereas host would be: some-ip-address 0.0.0.0. (For more in-depth coverage of wildcard mask notation, see my previous blog on the topic ACLs on Cisco devices – Part two | Understanding Wildcard Masks.
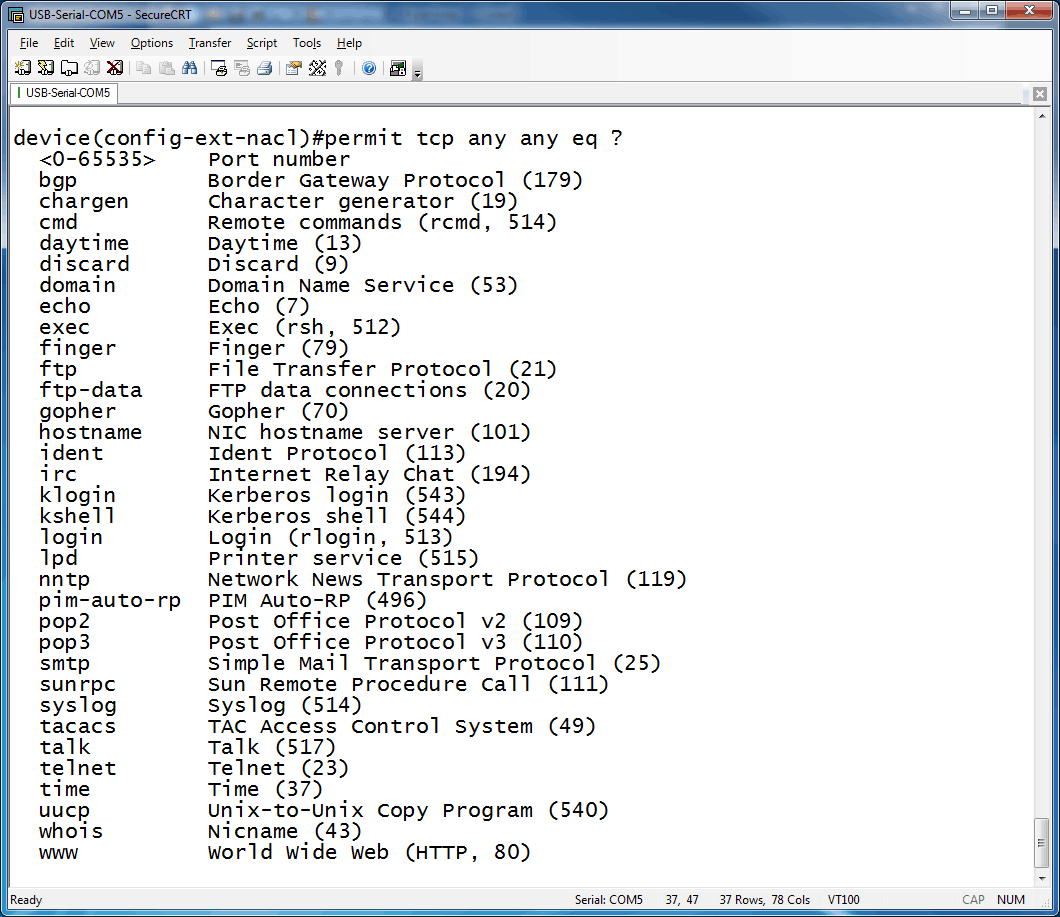
Now we get to the optional piece, the operator. Once again, a screenshot will show your options:
Limiting our scope to the introductory information, the most frequently used operator is “eq,” which means to match only packets on the given (subsequent) port number. We are not allowed to use the equals sign (=), so we use “eq” instead. A couple of others you may wish to note are “gt” and “lt,” which mean “greater than” and “less than” respectively. And finally…destination port information. Here is a screenshot:
As you can see, your options on source ports is extensive. As a network admin, you wield great power, but as a genie once said, “With great power comes great responsibility,” or something like that.
Now that we have reviewed the syntax of an extended ip access-list, hopefully they aren’t so intimidating any more.
Let’s throw one out as an example (each entry is its own line):
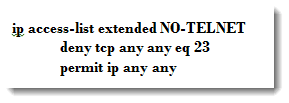
Let’s decipher what this list will do. First, it is a named list, and its name is NO-TELNET. ACL names are case-sensitive, so when you go about deploying this list, make sure you match case. The second line says the device will block traffic from any source to any destination address, IF the destination port is Telnet (port 23). The final line says to allow all other traffic. Remember that at the end of every ACL is an implicit “deny” statement, so leaving off this permit statement would block ALL traffic. This leads to the conclusion that if a list is comprised entirely of deny statements, NO traffic will pass. Be aware of this as you create your lists.
Now it is time to go forth and conquer!! There are so many cool things you can do with ACLs – grab a lab device, grab GNS3, purchase the labs from Cisco Learning Labs , but start creating ACLs so your comfort level grows and your expertise becomes legendary.
Thanks for reading my blog! Feel free to post any comments you may have….
Mark Jacob
Cisco Instructor – Interface Technical Training
Phoenix, AZ


")
A Simple Introduction to Cisco CML2
Mark Jacob, Cisco Instructor, presents an introduction to Cisco Modeling Labs 2.0 or CML2.0, an upgrade to Cisco’s VIRL Personal Edition. Mark demonstrates Terminal Emulator access to console, as well as console access from within the CML2.0 product. Hello, I’m Mark Jacob, a Cisco Instructor and Network Instructor at Interface Technical Training. I’ve been using … Continue reading A Simple Introduction to Cisco CML2
Creating Dynamic DNS in Network Environments
This content is from our CompTIA Network + Video Certification Training Course. Start training today! In this video, CompTIA Network + instructor Rick Trader teaches how to create Dynamic DNS zones in Network Environments. Video Transcription: Now that we’ve installed DNS, we’ve created our DNS zones, the next step is now, how do we produce those … Continue reading Creating Dynamic DNS in Network Environments
Cable Testers and How to Use them in Network Environments
This content is from our CompTIA Network + Video Certification Training Course. Start training today! In this video, CompTIA Network + instructor Rick Trader demonstrates how to use cable testers in network environments. Let’s look at some tools that we can use to test our different cables in our environment. Cable Testers Properly Wired Connectivity … Continue reading Cable Testers and How to Use them in Network Environments