Here’s how you can make your own bootable Kali Linux installer on USB

I use Kali Linux extensively when doing penetration testing and security assessments. Besides being fast, Kali Linux has pretty much every security tool I need built right in. On top of that, it’s free!
Another benefit, the topic of a previous blog, is that Kali Linux is easily installed on and run from a USB stick. But you can also build a bootable USB stick that will install Kali Linux onto a desktop or laptop’s hard disk. Here’s how you can make your own bootable Kali Linux installer on USB.
First, gather the necessary supplies. These are:
- A working PC running Windows 7 or later. I build the image from a current PC.
- A blank USB stick. It must be 8GB or larger, and should be USB 3 for speed.
- The original installation ISO from Kali.org. Do not download it from anywhere else, as you never know what you’re getting..
- Win32 Disk Imager. I always grab the most current version directly from Win32 Disk Imager
Before mucking with the software I insert the USB stick in the PC and make sure it is recognized. I also remove any other USB or removable media to prevent mishaps.
Next, I fire up Win32 Disk Imager. Yes, I know the name implies Windows, but this powerful little tool works quite well for Linux too.
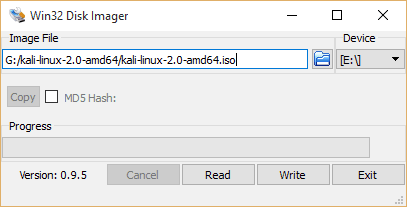
It’s got a lovely clean interface! Notice how it found the USB stick mounted as drive E on the right side.
Now I click the blue folder icon to the right of the Image File box. This opens a file browse window. I browse to the downloaded Kali Linux ISO and click OK.
Special note: If the ISO doesn’t appear on the file list, drop down the file type and choose *.* because, by default, Win32 Disk Imager only displays IMG files.
Now I click Write. Win32 Disk Imager automatically formats the USB stick as bootable and copies the Kali Linux files into the proper locations. After about 5 minutes Win32 Disk Imager announces that it’s finished.
Now insert the USB stick in the PC where you want to install Kali Linux and start it up. When prompted, choose to boot to USB. If you’re not prompted, you may have to configure the computer’s BIOS to enable USB boot.
When booted, the Kali Linux USB installation provides this menu:
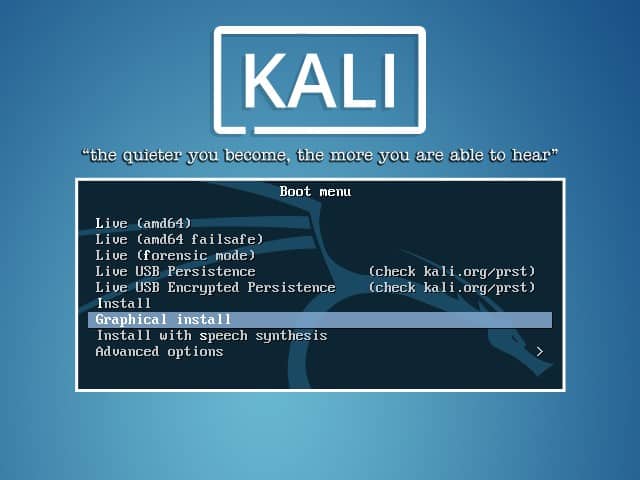
That dragon logo… awesome. Best. OS logo. Ever.
Now uses the down arrow to move the selection to Graphical install. This begins the Kali Linux installation process where you can choose volumes, create partitions, etc.
As a lovely extra benefit you can also select Live or Live USB Persistence to run Kali Linux entirely from the USB stick without installing it. Your choice!
Mike Danseglio – CISSP, MCSE, and CEH
Mike Danseglio teaches IT Security Training, Windows, System Center and Windows Server 2012 classes at Interface Technical Training. His classes are available in Phoenix, AZ and online with RemoteLive™.


")
A Simple Introduction to Cisco CML2
Mark Jacob, Cisco Instructor, presents an introduction to Cisco Modeling Labs 2.0 or CML2.0, an upgrade to Cisco’s VIRL Personal Edition. Mark demonstrates Terminal Emulator access to console, as well as console access from within the CML2.0 product. Hello, I’m Mark Jacob, a Cisco Instructor and Network Instructor at Interface Technical Training. I’ve been using … Continue reading A Simple Introduction to Cisco CML2
Creating Dynamic DNS in Network Environments
This content is from our CompTIA Network + Video Certification Training Course. Start training today! In this video, CompTIA Network + instructor Rick Trader teaches how to create Dynamic DNS zones in Network Environments. Video Transcription: Now that we’ve installed DNS, we’ve created our DNS zones, the next step is now, how do we produce those … Continue reading Creating Dynamic DNS in Network Environments
Cable Testers and How to Use them in Network Environments
This content is from our CompTIA Network + Video Certification Training Course. Start training today! In this video, CompTIA Network + instructor Rick Trader demonstrates how to use cable testers in network environments. Let’s look at some tools that we can use to test our different cables in our environment. Cable Testers Properly Wired Connectivity … Continue reading Cable Testers and How to Use them in Network Environments
Pingback: Performing Root Tasks as a Non-Root User in Kali Linux