How to Make your Linux Box a DHCP Server

This topic is of interest to readers who are desiring their Network Plus certification, or those who just like to tinker with network settings (in a safe and approved environment) and observe the results. In this blog, I will delve into configuring your Linux box as a DHCP server, and then I will show a client obtaining its information from this DHCP server. Let’s get rolling…
First off, I will be working with a machine running the Ubuntu distribution of Linux. I have a client box which is running Windows XP (yes, XP, I just can’t let it go) but the client can be any IP endpoint that supports obtaining its network information via DHCP. Keep in mind that I am not covering every subtle nuance of fine-tuning DHCP on a Linux box, I will just show a basic configuration which will allow DHCP clients to be served. I want to verify that my client is running DHCP and at least attempting to talk to a DHCP server.

Figure 1
This is actually expected behavior, since I haven’t yet configured the Linux box to answer the client requests. But it does verify that the client machine is in the correct state because it tries in vain to contact a DHCP server. So on to the server.
The first thing I want to do on my server box is to configure a static IP address on the interface with which DHCP will be associated. This may already be done on your box, but if not, here is what needs to be done. Type this command:
sudo nano /etc/network/interfaces (sudo allows me to execute this command with elevated privileges.) If you have not executed a command using sudo within the last five minutes (by default) you will be prompted for a password which entitles you to execute the command. I have entered the password, and here is the resulting output:
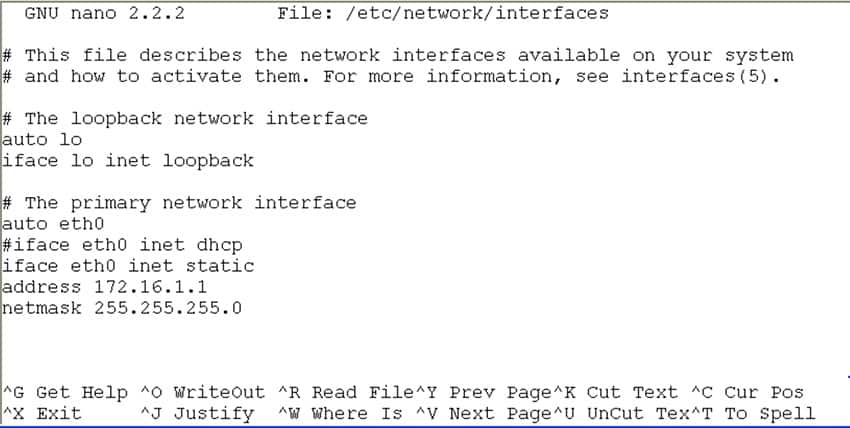
Figure 2
As you can see, I have set a static IP address of 172.16.1.1 /24 on interface Ethernet 0 (eth0). I placed the ‘#’ symbol in front of the line referencing dhcp, because my interface cannot be both statically set and a dynamic client itself. I saved these changes and exited the editor. However, to get my system to adjust to this change, I must execute this command:
sudo /etc/init.d/networking restart
Once this is done, I can use ifconfig to check status:
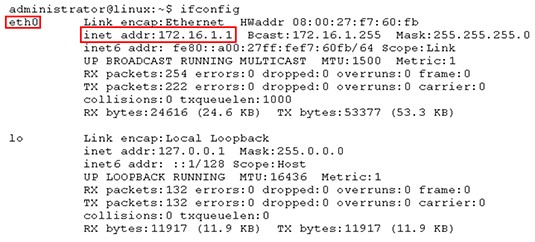
Figure 3
So far so good. Now to execute the commands to enable DHCP. Many of my readers are quite likely Cisco people and as such may already be quite comfortable with configuring DHCP on a Cisco router. I have blogged on this topic in the past, and if you want a refresher, go here. While the concept is the same, the commands (and how and where to type them) are different. The first thing that must be done is to tell the box on which interface DHCP will be active. Type the following:
sudo nano /etc/default/dhcp3-server
In my case, I want it all to happen on eth0, so notice the output once I have entered this:
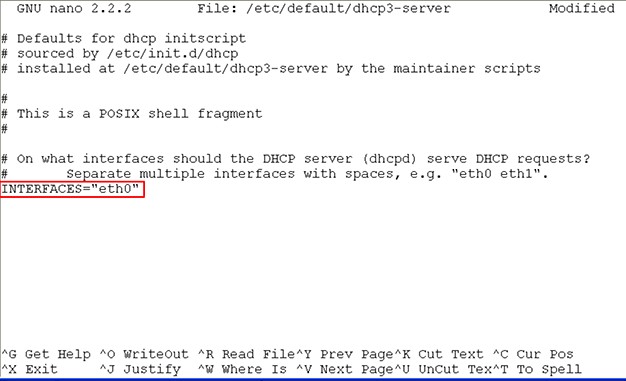
Figure 4
Before I entered eth0, it looked like this INTERFACES=””
Now I save these changes and exit. The next step is to configure the configuration file that dhcp will use to hand out client information. That is done by typing the following command:
sudo nano /etc/dhcp3/dhcpd.conf
Once inside the editor, there is a sequence of commands to type. I scrolled down until the entries ended and then added the needed commands to the end. Here is what that looked like:
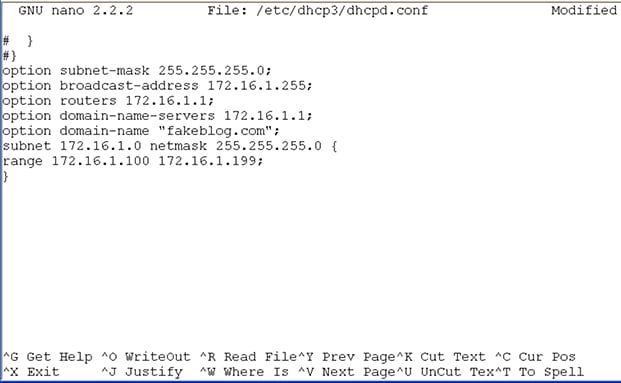
Figure 5
Now I save and exit the editor. To force to system to acknowledge the change, execute this command:
sudo /etc/init.d/dhcp3-server restart
Now we go to the XP client, release and renew its IP information, and see if it receives and IP address from the pool we just created.

Figure 6
And there it is! Client has been served. This is a pretty handy config to keep around, especially for building home lab scenarios where you are using Linux machines to practice your networking skills. If you have any suggestions or comments, I would love to hear them!
Until next time…
Mark Jacob
Cisco and CompTIA Network + Instructor – Interface Technical Training
Phoenix, AZ


A Simple Introduction to Cisco CML2
Mark Jacob, Cisco Instructor, presents an introduction to Cisco Modeling Labs 2.0 or CML2.0, an upgrade to Cisco’s VIRL Personal Edition. Mark demonstrates Terminal Emulator access to console, as well as console access from within the CML2.0 product. Hello, I’m Mark Jacob, a Cisco Instructor and Network Instructor at Interface Technical Training. I’ve been using … Continue reading A Simple Introduction to Cisco CML2
Creating Dynamic DNS in Network Environments
This content is from our CompTIA Network + Video Certification Training Course. Start training today! In this video, CompTIA Network + instructor Rick Trader teaches how to create Dynamic DNS zones in Network Environments. Video Transcription: Now that we’ve installed DNS, we’ve created our DNS zones, the next step is now, how do we produce those … Continue reading Creating Dynamic DNS in Network Environments
Cable Testers and How to Use them in Network Environments
This content is from our CompTIA Network + Video Certification Training Course. Start training today! In this video, CompTIA Network + instructor Rick Trader demonstrates how to use cable testers in network environments. Let’s look at some tools that we can use to test our different cables in our environment. Cable Testers Properly Wired Connectivity … Continue reading Cable Testers and How to Use them in Network Environments