Time to Recover – Rebuilding your Computer

(Part two in a series) For part one go to:
Before you Rebuild your Computer (Actually, before your system fails)
In my last blog, I shared suggestions that might help you to affect an efficient return to service for your computer system. The day has come. Your system is corrupted or has failed (or become obsolete, or been stolen, or ???) You need to take the steps to affect a functioning system that has a stable OS, all the applications that you need, and access to your valuable data.
Where do you start?
Unless you know the exact purpose and cause, you should use the scientific method to identify what happened and why before you proceed. The friends who requested my assistance tried several alternatives on their own before coming to me. Trial and error, without a hypothesis and problem isolation, might make the situation worse and limit the number of alternatives. It’s truly uncomfortable saying, “we need to wipe everything and you need to start all over. I hope you have a complete data backup?”
Consider the carpenter’s adage, measure twice – cut once. Play several scenarios out virtually before you try the first one that comes to mind. Do some homework. If your system is down, borrow access to another. Go to the public library if you must.
Hardware is relatively inexpensive to replace. Rebuilding your data and a fully functional system requires hours, or perhaps days or weeks depending on your preparations for this moment. Don’t take shortcuts when just a little more expense during preparation can save you many hours of secondary effort and additional recovery.
Is there still data on a drive that needs to be recovered? Do you have all the hardware and tools (physical and software) that you need? Is support available and will they be when you run into problems three hours from now?
Acquire a secondary hard drive and a clamshell or external housing with a USB adapter. This tool allows you to remove a drive in order to run a virus scan from a clean system, or to attempt isolated data capture, or to rebuild your system on a new (and potentially larger, faster) drive or to migrate data from the drive you removed by attaching it to the external housing. Aside from the drive, related kits start as low as $39. Well worth the investment.
Remember the Last Known Good recovery option? You tap the F8 key repeatedly to access the Safe Mode menu. You are presented with several options, amongst them Last Known Good. Last Known Good is a snapshot of your registry taken effectively at the moment that you experience the Windows splash screen and startup.wav file. The Last Know Good option is usable once and only once, to restore your registry to that last good state before something happened to corrupt your operating system (unsigned driver, incompatible patch or update, malware?). You had better plan your process before you attempt this option, or other one shot remedies, like System File Checker (sfc.exe) with the /scannow option. Admittedly, you can try such options repeatedly, although failure to resolve the issue with the first attempt suggests a different issue – and you may accidentally create another problem layer.
If you are uncertain about the cause or your process, then a diagnostic mode might be your first step. Use an alternate boot option like Safe Mode, or a PE environment, or a vendor diagnostic partition to explore your system, settings, and hardware
I wrote an entire blog focusing on the SFC /scannow option to diagnose and repair OS corruption across Windows Vista through Windows 8.1. If you are repairing a corrupted system, running SFC from a PE boot environment is a powerful option.
Repair isn’t an option? Time to head toward system recovery.
Create a checklist (use the following table as a starting point) to explore your options and decide which might be your best approach.
| Gather resources | ||
| People | Identify potential assistance. Check or gather phone numbers, email, and availability. Asking for information is usually easier than begging for assistance and it tends to cost less in terms of cash and relationships. | |
| Systems | Check that you have all the hardware, housings, cables, power resources, drives and external housings, hubs or switches that you might need. Think beyond the operating environment. Consider the creation of an ICU to isolate the system you are repairing or recovering. | |
| BIOS/UEFI | Confirm the keystrokes, accounts, and settings required to access BIOS/UEFI settings. Booting from external media, an alternate drive configuration, or altering startup security may require access to the BIOS/UEFI interface. | |
| Media | PE or recovery CD/DVD/USB. Operating system and application install media, and/or documentation pointing to online sources. | |
| Data files | Data media and/or documentation pointing to network and cloud storage locations. Gather account access information that you might need as well. | |
| Customized plan | ||
| Sequence | Using the same or replacement hardware? Migrating in place or moving data elsewhere to take a wipe and load approach? You always want to plan for the sequence:
Remember that data on NTFS systems tend to inherit the permissions of the storage location into which they are moved, and a restore is movement from one media location to another (only relocation within the same partition is considered a copy.) | |
| Needs | Take some time to understand recovery priorities. A stable recovery to operation is far more important than having to repeat or repeal part of the process. Does the system owner need to have everything immediately, or the focus to resume a specific effort? We want EVERYTHING, yet what do we most NEED? | |
| Connectivity | In a Cloud connected world, many resources are best or only found via the Internet. Consider how you will securely and efficiently affect connectivity to LAN and WAN resources as an early recovery step. Confirm that you have the equipment, cables, test system (to confirm connectivity before your system is recovered), and account information ready and at hand. | |
| Recover versus Replace | ||
| Operating system | You need to OS to be stable and OS tools to be available as a platform for any other effort. Your options include – given in order of increasing invasiveness and potential existing data overwrite or loss:
| |
| Drivers | Hardware doesn’t work without the correct drivers, and with all versions of the Operating System since Windows Vista, the drivers must be digitally signed using an authoritative certificate recognized by the Windows Credential Manager. In other words, merely acquiring a driver from the hardware manufacturer or the media accompanying the device may no longer be sufficient.Some source options include:
You MUST assure that you have the appropriate and signed storage, video, and network drivers before you begin, or any attempts to navigate and create/recover your OS will be nearly impossible. | |
| Applications | You might attempt recovery using:
In order to recover applications, you may need the original install media AND the license key. Many vendors provide tools to recover or totally remove prior installations in order to affect a clean installation. Find them before you start the process and incorporate them into your recovery media. Identify whether multiple versions of an application can co-exist on the operating system as a means to migrate data. Check for alternate, compatible applications that might be used to validate data viability. OpenOffice [https://www.openoffice.org/] might be an alternative to validate your Word, Excel and PowerPoint files. Install, update, and test your security software before you recover your data. | |
| Data | Identify and gather your information and data sources.You might try recovery via:
If you need to restore data: Create the storage/directory infrastructure and assign security permissions. Plan and prepare a method to both validate and malware scan the data before use on your new system. Then use:
|
Windows 8/8.1
Some clarification of Windows 8/8.1 tools is in order. Understand them before you attempt to use one of them. The gateways to their use request repeated confirmation. Once you pass the last confirmation, you are headed down a one way street.
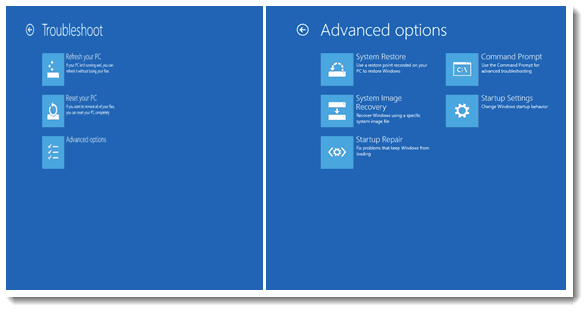
When you enter the system recovery (RE) options for Windows 8.1, you are guided through menus similar to those captured above. Note that options and their outcomes may vary depending upon the nature of your BIOS/UEFI and vendor provided tools.
- Refresh your PC effectively restores the Operating System and driver component of your system from the Windows Image File (.wim) located on your system. This is similar to running a SFC /scannow, except you are replacing all related system files rather than merely those whose digital signatures are found not to match. This option does not repair or recover personal settings, data, or applications. Caution should be exercised, since the process may actually cause third-party applications to fail and require subsequent repair. If possible, make certain to backup your data and settings before selecting this option, since your only option should the process fail is complete system reset or re-creation.
- Reset your PC restores the Operating System to the original Windows image (or the image provided on an OEM recovery partition if present). In this case all user accounts, preferences, settings and all applications will be overwritten. This is effectively a restore of the system to its state at the point of system delivery/receipt. You will need to follow your checklist to acquire updates, reinstall applications, rebuild user accounts or restore profiles, and replace data.
- System Restore might work if you enabled System Protection and scheduled or captured Restore Points. You will be provided the option to select from amongst available, local Restore Points.
- System Image Recovery will prompt for the location of a Windows Image File (.wim) that will be used to replace the current Operating System. The .wim may be in local media, a network share, or acquired via Active Directory Recovery image if the latter has been enabled in your Enterprise environment.
- Startup Repair attempts to repair the RE partition by restoring the Bootmgr.exe from the boot.wim file and the Boot Configuration Database (BCD) to a generic/default state. Any multi-boot or custom boot settings will be lost via this process. If the boot.wim is corrupted or your drive partitions are non-standard, then you may be forced to re-partition your drive and begin installation from scratch. Do NOT try this solution unless you have carefully copied your accounts, preferences, application information, and data toward the possible of a full OS replacement.
- Command Prompt will take you to the RE command prompt environment from which command line tools including SFC, DISM, Bootrec.exe and other system or image management tools may be launched.
Although this is already a rather long blog…let me share a few of the scenarios that prompted its writing. All of these scenarios occurred and resulted in friends or clients calling me across a three week period. Each call came from technically competent individuals. (One was mine, and I would like to believe I am technically competent.) Each incident resulted from taking one shortcut. Think about what you might try differently based upon my prior recommendations, your experience and your environment.
Scenario One: A friend is migrating from Windows XP to Windows 7. Plenty of room for the new OS on the hard drive and according the Microsoft Compatibility Evaluator the system can support Windows 7. Automated migration tools are recommended. All of the data is manually copied from the C: partition to a large external storage device. Windows 7 is installed via an upgrade in place option from a retail DVD. Oops. The network card doesn’t work, and the video is forced to a standard 640×480 resolution. First call for assistance placed. Several days effort finding signed drivers from Dell and using Device Manager to install and test them. The network works and updates are available, but the desire to return to operation is great so applications and data are copied from the external storage in their entirety. Copying the applications from the external storage device does not enable the applications, and clicking on the data files does not launch a compatible application. Limited application install media or license information was retained. Second call for assistance placed. Why plan when help is available? Importing the Outlook .PST file into a newer version of Outlook created additional folders and none of the profile information was recovered. This recovery continues weeks later as applications and data are removed manually from the new system partition, and restored using Microsoft and third-party application migration tools.
Scenario Two: A client’s laptop is infected by malware. The laptop is delivered to a system technician for data recovery and system re-imaging. A tower system is relocated from an unused office by the business staff. It has Windows 7, and an Office365 license installed. No other applications (including AV, or security solutions). The jump drive used with the laptop is immediately plugged into the tower system for resumption of business. Two days later, the tower system will not boot. A call for assistance is placed. Malware on the jump drive is identified as the cause of the problem. Just over three hours of effort later the tower system is re-imaged to factory settings and Windows update is launched. Then Office365 is reinstalled, Windows Defender is enabled and updated, the data files scanned and the malware quarantined. The laptop is returned a few days later and both systems appear safe and operational. One result: More than 14 billable hours of effort in addition to friendly assistance.
Scenario Three (Mine): A video card in a five year old system appears to fail. Although it is possible to safely start and shutdown the system, basic navigation is impossible. The ability to launch backup tools or confirm Cloud based synchronization is prevented. The system is presented to a certified technician for repair. The symptoms might require a new video card, or a new motherboard, and/or other components and perhaps a new system depending on the cost of replacement versus lengthy repair efforts. What about the data on the drive? Not a problem – copies of current files are confirmed on network storage via a laptop. But three critical applications and their licenses are on the failing system. The laptop does not have the horsepower to run the applications, even if new licenses are purchased. Wait or get a new system? We limped along for a week. Repair cost $250. Lost income opportunities: $2,000-$3,000. Next time I will buy a new system and the application licenses are carefully recorded toward future need. A plan for system recovery has been developed, and applications identified in priority order for resumption of business.
Scenario Four: Internet connectivity is low bandwidth and Cloud based alternatives untrusted. An USB attached external storage is acquired to store pictures and video files. The system is configured to automatically backup data to the external storage. The storage device is plugged into a surge suppressor as is the PC. The need to retrieve a photo arises over the holidays. The file cannot be found. Call for assistance. Discovery: The desire to use a portable “thumb drive” overrode the importance of having a data backup. The external storage device was relocated without proper ejection, and the power plug moved directly to an AC receptacle to accommodate its relocation. The USB connector for the external storage is only connected when remembered and convenient because other USB devices are not being used. The original data state of the storage device is intact, but a CHKDSK identifies that more than half the storage sectors on the device have been damaged. Many of the interim backup images are corrupt, including the time period during which the desired photo would have been taken and stored. The external storage device is effectively instable and needs to be replaced by a local network-attached storage device and a larger surge suppression device. Lost photos: priceless. Cost of an alternate solution: $400.
Scenario Five: A relatively new laptop with Windows 8.1 was acquired; containing dozens of OEM provided applications. Options included a 90 day AV evaluation. Evaluation expired. Data is stored through the network or via the Cloud. Someone recommended an application that was retrieved from the Internet via a generic download site. Malware infection claimed the system in a matter of days. A Windows 8.1 Reset you PC option was selected from amongst the System Recovery options. A pre-release copy of my Give Me Defender [link?] blog was provided. This enables the full removal of third-party vendor AV solutions (like those provided within OEM images), and the installation of Windows Defender. Desired applications were reinstalled, and data immediately accessible. Windows Defender now actively scans and protects the system – no evaluation license required. Less than an hour worth of assistance, and the requestor was able to execute the recovery plan smoothly, and on their own.
May you never encounter a recovery scenario of your own, at least not without a plan, tools, and the preparations to use them.
Hope to see you in the classroom or online!
Steve teaches PMP: Project Management Fundamentals and Professional Certification, Windows 7, Windows 8.1 and CompTIA classes in Phoenix, Arizona.


A Simple Introduction to Cisco CML2
Mark Jacob, Cisco Instructor, presents an introduction to Cisco Modeling Labs 2.0 or CML2.0, an upgrade to Cisco’s VIRL Personal Edition. Mark demonstrates Terminal Emulator access to console, as well as console access from within the CML2.0 product. Hello, I’m Mark Jacob, a Cisco Instructor and Network Instructor at Interface Technical Training. I’ve been using … Continue reading A Simple Introduction to Cisco CML2
Creating Dynamic DNS in Network Environments
This content is from our CompTIA Network + Video Certification Training Course. Start training today! In this video, CompTIA Network + instructor Rick Trader teaches how to create Dynamic DNS zones in Network Environments. Video Transcription: Now that we’ve installed DNS, we’ve created our DNS zones, the next step is now, how do we produce those … Continue reading Creating Dynamic DNS in Network Environments
Cable Testers and How to Use them in Network Environments
This content is from our CompTIA Network + Video Certification Training Course. Start training today! In this video, CompTIA Network + instructor Rick Trader demonstrates how to use cable testers in network environments. Let’s look at some tools that we can use to test our different cables in our environment. Cable Testers Properly Wired Connectivity … Continue reading Cable Testers and How to Use them in Network Environments