Troubleshooting NAT pools on Cisco routers

This blog will address the configuration of NAT pools on Cisco routers as well as how to troubleshoot the network when NAT has been introduced. The network diagram
shown below represents the environment where all the action is taking place in
this blog. Here is a diagram of the network:
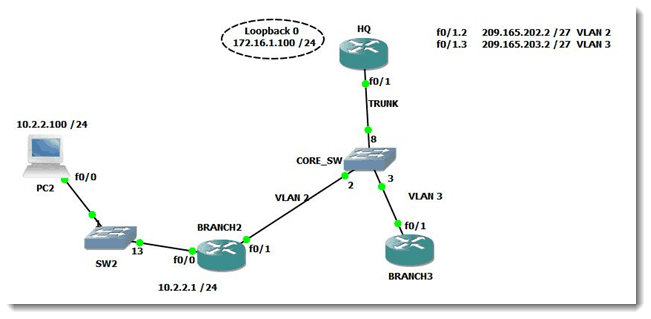
The goal in this blog is to create a NAT pool on BRANCH2 which allows PC2 behind it to access the addresses available on HQ, which is playing the role of a remote target. Let us first configure a pool of addresses, or dynamic NAT, on BRANCH2. Here is the config:
interface FastEthernet0/0
ip address 10.2.2.1 255.255.255.0
ip nat inside
!
interface FastEthernet0/1
ip address dhcp
ip nat outside
!
access-list 1 permit 10.2.2.0 0.0.0.255
!
ip nat pool NAT_POOL 209.165.202.5 209.165.202.10 prefix-length 24
!
ip nat inside source list 1 pool NAT_POOL
Notice that the inside and outside interfaces have been identified. Additionally, I have configured the access list that controls which IP addresses are permitted to be NATed. The last piece to make this work is the ip nat command, which is also shown above. With all the commands in place, let’s make sure NAT is occurring. First, I will generate a ping from BRANCH2 to HQ to check:
BRANCH2#ping 172.16.1.100
Type escape sequence to abort.
Sending 5, 100-byte ICMP Echos to 172.16.1.100, timeout is 2 seconds:
!!!!!
Success rate is 100 percent (5/5), round-trip min/avg/max = 20/24/32 ms
BRANCH2#
So far, so good. Now let’s look at the NAT translations:
BRANCH2#sh ip nat translations
BRANCH2#
The fact that nothing shows up in response to that command indicates that there are no NAT translations to display. Why not? We saw the ping succeed! The key to understanding this rests upon the answer to this question: From where did BRANCH2 generate the ping? By default, BRANCH2 would have used its interface f0/1, which looks like this:
BRANCH2#sh ip int f0/1
FastEthernet0/1 is up, line protocol is up
Internet address is 209.165.202.1/27
That means would have come from that source IP address. What does that mean for our NAT investigation? It means that BRANCH2 would not have had to perform NAT-related action in order to ping from the f0/1 interface to HQ and back. So there will be nothing shown in response to sh ip nat translation. To truly verify this, we can go to HQ and issue the command debug ip icmp, so we can ascertain from where these pings are originating. Let’s do that. Here is what happened in response to a ping from BRANCH2 to HQ at 172.16.1.100:
HQ#
Mar 1 00:40:55.255: ICMP: echo reply sent, src 172.16.1.100, dst 209.165.202.1
Mar 1 00:40:55.283: ICMP: echo reply sent, src 172.16.1.100, dst 209.165.202.1
Mar 1 00:40:55.315: ICMP: echo reply sent, src 172.16.1.100, dst 209.165.202.1
Mar 1 00:40:55.335: ICMP: echo reply sent, src 172.16.1.100, dst 209.165.202.1
Mar 1 00:40:55.355: ICMP: echo reply sent, src 172.16.1.100, dst 209.165.202.1
HQ#
So the response from HQ indicates that it is answering to interface f0/1 on BRANCH2 as suspected. Now let’s try something else. I have a client, PC2, behind the BRANCH2 router. I want to block this PC2 from being able to Telnet to HQ. Let configure the access list for that.
ip access-list ext NO-PC2
deny tcp host 10.2.2.100 any eq telnet
permit ip any any
Then I go to my vty lines on HQ to place this access list there to block incoming telnet from PC2:
line vty 0 15
access-class NO-PC2 in
Let see what happens when we try to telnet from PC2 to the loopback address on HQ.
PC2#telnet 172.16.1.100
Trying 172.16.1.100 … Open
HQ#
As you can see, PC2 got right in to HQ on the vty line using telnet. This was supposed to be blocked by our access list. It specifically mentions PC2’s IP address. How is he getting through the access list? Let’s take a look at the users on HQ.
HQ#sh user
Line User Host(s) Idle Location
* 0 con 0 idle 00:00:00
98 vty 0 idle 00:01:59 209.165.202.6
Interface User Mode Idle Peer Address
HQ#
That address sounds familiar! Could it be? Yes, it is the first address we configured on the pool on the BRANCH2 router. What this means is that the address we are attempting to block, 10.2.2.100, is not the address that is getting in to the HQ router. PC2’s address is being translated. The 10 dot address, through the process of NAT, is being replaced, or substituted, with the first address in the translated pool. So if we want to stop telnet access to HQ, we need to be much more aware of the entire topology of the network we are managing. In this case, a solution would be to block the address that NAT is using to send requests to external destinations on their way. This means I should block the addresses in the pool. The pool was configured like this: 209.165.202.5 209.165.202.10, with .5 being the first address and .10 being the last. Let us create an access list which catches the above addresses. access-list 120 permit ip 209.165.202.4 0.0.0. 7
I have applied the above access list to HQ on the line vty 0 15. I have removed the previously configured access list, since one per port, per direction, can be configured. Now let’s see what happens when I try to get to HQ from PC2 using telnet:
PC2#telnet 172.16.1.100
Trying 172.16.1.100 …
% Connection refused by remote host
PC2#
Cool! It looks like adjusting the access list has worked – PC2 fails to access HQ using telnet. So this is a valuable learning experience. Now that we have seen the consequences, we are encouraged to carefully examine the network diagram, the job requirements, and our own configurations, to make sure we don’t overlook some silly little thing which takes the whole network, or at least the area in our charge, down for the day. There is nothing more fun than troubleshooting a down network while all the uses and your boss are all standing around waiting for you to isolate the cause and deploy a solution. Let’s speed that step up considerably by having in mind a definite plan of action when there are network glitches. Restoring connectivity quickly is our goal – let’s give ourselves the tools, and the familiarity with these tools, to maximize our efficiency when it comes to troubleshooting when something is broken.
Until something breaks….
Mark Jacob
Cisco Instructor – Interface Technical Training
Phoenix, AZ

 and (WINS)")


A Simple Introduction to Cisco CML2
Mark Jacob, Cisco Instructor, presents an introduction to Cisco Modeling Labs 2.0 or CML2.0, an upgrade to Cisco’s VIRL Personal Edition. Mark demonstrates Terminal Emulator access to console, as well as console access from within the CML2.0 product. Hello, I’m Mark Jacob, a Cisco Instructor and Network Instructor at Interface Technical Training. I’ve been using … Continue reading A Simple Introduction to Cisco CML2
Creating Dynamic DNS in Network Environments
This content is from our CompTIA Network + Video Certification Training Course. Start training today! In this video, CompTIA Network + instructor Rick Trader teaches how to create Dynamic DNS zones in Network Environments. Video Transcription: Now that we’ve installed DNS, we’ve created our DNS zones, the next step is now, how do we produce those … Continue reading Creating Dynamic DNS in Network Environments
Cable Testers and How to Use them in Network Environments
This content is from our CompTIA Network + Video Certification Training Course. Start training today! In this video, CompTIA Network + instructor Rick Trader demonstrates how to use cable testers in network environments. Let’s look at some tools that we can use to test our different cables in our environment. Cable Testers Properly Wired Connectivity … Continue reading Cable Testers and How to Use them in Network Environments
Pingback: A Cisco solution that’s perfectly NAT-ural