Windows Image File Exclusions

When discussing the creation of Windows Image files (.wim), I am often asked if any files or folders are excluded by default. The answer is yes and no, depending on the tool(s) that you use. Read on for a deeper understanding.
Windows 7 and Windows 8 each provide the option to create a full Windows image file as a system backup option.
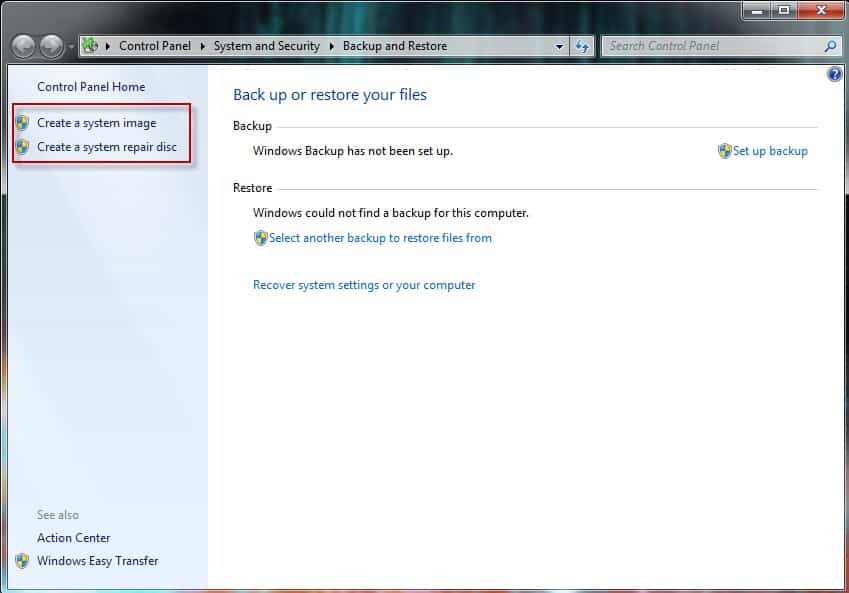
Within Windows 7, navigate to Control Panel > System and Security > Backup and Restore, then select the Create System Image link. Note that elevated permissions are required, and you probably want to Create a system repair disk (a Windows PE environment specifically for the system on which it is created) as well.
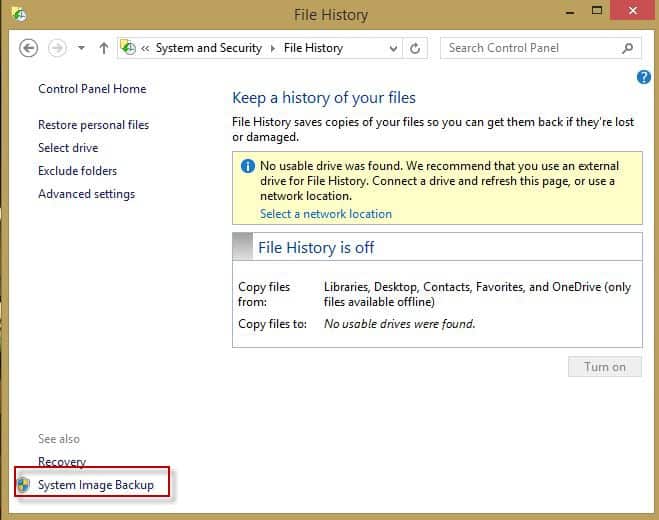
Within Windows 8/8.1, the Create a system repair disc option is not directly available, since Windows 8/8.1 incorporates its own recovery environment that includes PE functionality. The Create a system repair disk options do allow you to select to add the recovery partition to your backup media. To create a system image within Windows 8/8.1 navigate to Control Panel >System and Security > File History and select the System Image Backup link at the bottom left of the page. Note that this option is not available when navigating to and configuring File History via Update and Recovery through the PC Settings option of the charms bar.
Based on a modest documentation review, it does not appear that either of the aforementioned image backup options exclude any drive content. Both are designed to identify and backup all disks marked as active partitions.
If you identify that multiple partitions are being captured within your Windows image file, you may elect to use BIOS and the Disk Manager to assure that only the recovery and primary OS boot partitions are marked as active before creating a System Image backup.
If you truly want a full system backup image, then you likely want to copy all of the partitions … the goal of this blog is exclusion of unwanted content to optimize .wim file size. You should also note that the media to which the .wim file will be written should be formatted NTFS. As such you want to use a properly formatted USB drive or network share as the recovery destination. Finally, the drive will need significant storage space – a full Windows Image file for a system containing installed applications and user data may rapidly exceed 30 GB. You can create the recovery image on media with 512MB of storage, though not the full system image.
Within the Windows Automated Installation Kit (WAIK) for Windows 7, you may use ImageX to capture a Windows image file from the command prompt. ImageX documentation offers the use of an Exclusion List using the Wimscript.ini file. Wimscript.ini must be housed in the same directory as the ImageX tool, and will by default exclude such files as pagefile.sys, hiberfil.sys, the recycle bin (RECYCLER), and the client side cashing folder (\windows\CSC) used for offline file synchronization.
ImageX has been deprecated in the Windows 8/8.1 Assessment and Deployment Kit (ADK). DISM functionality has been expanded to encompass full image capture. After booting your system into a Windows PE command line environment, you will now use the DISM /Capture-Image syntax.
Dism /Capture-Image /ImageFile:c:\<name-your-wim>.wim /CaptureDir:C:\ /Name:”<My Wim Name>”
The sequence of instructions Capture Images of Hard Disk Partitions Using DISM
including use of Diskpart, DISM, and the Net command, as well as references to additional DISM functionality maybe found on Technet.
While relaying this information during a recent Configuring Windows 8/8.1 (MOC 205687D) course, the class elected to investigate which files might be automatically excluded when performing an image capture.
DISM also uses a wimscript.ini file, as long as it is located in the same directory as the DISM executable. Alternately, you may use the /ConfigFile argument with DISM. Full details DISM Configuration List and WimScript.ini Files are provided within Technet.
By default DISM will exclude the following file sets:
\$ntfs.log\hiberfil.sys\pagefile.sys\swapfile.sys”\System Volume Information”\RECYCLER\Windows\CSC DISM also offers the option of creating a custom Exclusion and Exclusion Exception file, as long as it uses identical internal section headers and is saved as a .ini file. Any name or directory path may be applied using the /ConfigFile:<exclusion file> argument. The <exclusion file> should incorporate the complete directory location and file name of the custom file, allowing the file to be located other than within directory containing the DISM command executable. The use of a custom exclusion file might be particularly useful for the creation of Windows Image captures when booting from a PE environment and then capturing custom .wim images to WDS or network file shares. Please note that none of the previous options complete a Sysprep equivalent process before capturing the Windows image, so caution must be taken before restoring the image to any other computer system than its original source. Best practice would dictate restoring the image to a ‘reference’ computer (image management system), in order to perform system review, updates, repair, and Sysprep before capturing a clean image to be used for broader deployment. Microsoft released an update for the Windows ADK for Windows 8.1 and Microsoft Deployment Toolkit (MDT) 2013 on April 3, 2014. Though not required, the update is recommended for individuals performing full image captures or deployment using PE and DISM capabilities.
Happy experimenting!
Hope to see you in the classroom or online!
Steven Fullmer
Interface Technical Training Staff Instructor


")
A Simple Introduction to Cisco CML2
Mark Jacob, Cisco Instructor, presents an introduction to Cisco Modeling Labs 2.0 or CML2.0, an upgrade to Cisco’s VIRL Personal Edition. Mark demonstrates Terminal Emulator access to console, as well as console access from within the CML2.0 product. Hello, I’m Mark Jacob, a Cisco Instructor and Network Instructor at Interface Technical Training. I’ve been using … Continue reading A Simple Introduction to Cisco CML2
Creating Dynamic DNS in Network Environments
This content is from our CompTIA Network + Video Certification Training Course. Start training today! In this video, CompTIA Network + instructor Rick Trader teaches how to create Dynamic DNS zones in Network Environments. Video Transcription: Now that we’ve installed DNS, we’ve created our DNS zones, the next step is now, how do we produce those … Continue reading Creating Dynamic DNS in Network Environments
Cable Testers and How to Use them in Network Environments
This content is from our CompTIA Network + Video Certification Training Course. Start training today! In this video, CompTIA Network + instructor Rick Trader demonstrates how to use cable testers in network environments. Let’s look at some tools that we can use to test our different cables in our environment. Cable Testers Properly Wired Connectivity … Continue reading Cable Testers and How to Use them in Network Environments
See what people are saying...