Subnetting a TCP/IP Network using the Magic Box Method
Subnetting a TCP/IP Network using the Magic Box Method
See our class schedule for complete Course Schedule Training.
Classes are held in Phoenix, AZ and can be attended online from anywhere in the world with RemoteLive™.
Instructor: Rick Trader
Video Transcription:
One of the things that we might have to do in our corporate network is to take a class of IP addresses and then subnet that into what’s called a Classless IP Addressing Scheme.
If our corporation owns a Class B or Class C address we might not want to use private IP addressing to accomplish multiple network segments.
In this session, we are going to look at how to subnet a Class B address into multiple network segments using what’s called The Magic Box. You may or may not have heard of the Magic Box before. You may have learned subnetting in a Microsoft class or learned how to subnet in a Cisco class, CompTIA + or a Citrix class.
There’s many different ways of accomplishing the same task. One of the things I learned a long time ago from another instructor was a feature called the Magic Box. For me, it made sub‑netting very simple.
Let’s run through this real quick.
First of all, before you can subnet a network, you have to understand how the subnet mask works and is associated with our IP address. It’s going to do a feature referred to as ANDing.
What ANDing is, is I’m going to take each bit of the IP address, binary IP address, and I’m going to AND it with a bit in the subnet mask.
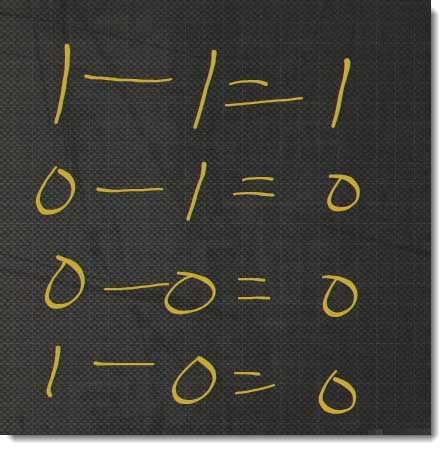
When we AND, we have one and one as our bits will also equal one out. If we have a zero in, it doesn’t matter whether it’s zero and zero, one and zero, or zero and one, if there’s a zero in on that bit, it’s always going to be a zero out.
The reason why they refer to it as ANDing, it’s actually from an electronics term of a feature called an AND gate. An Andgate had two leads in and a lead out. If you got a logic level-one in on both leads, you got a logic level-one out, otherwise, you got a zero out, so the process of ANDing.
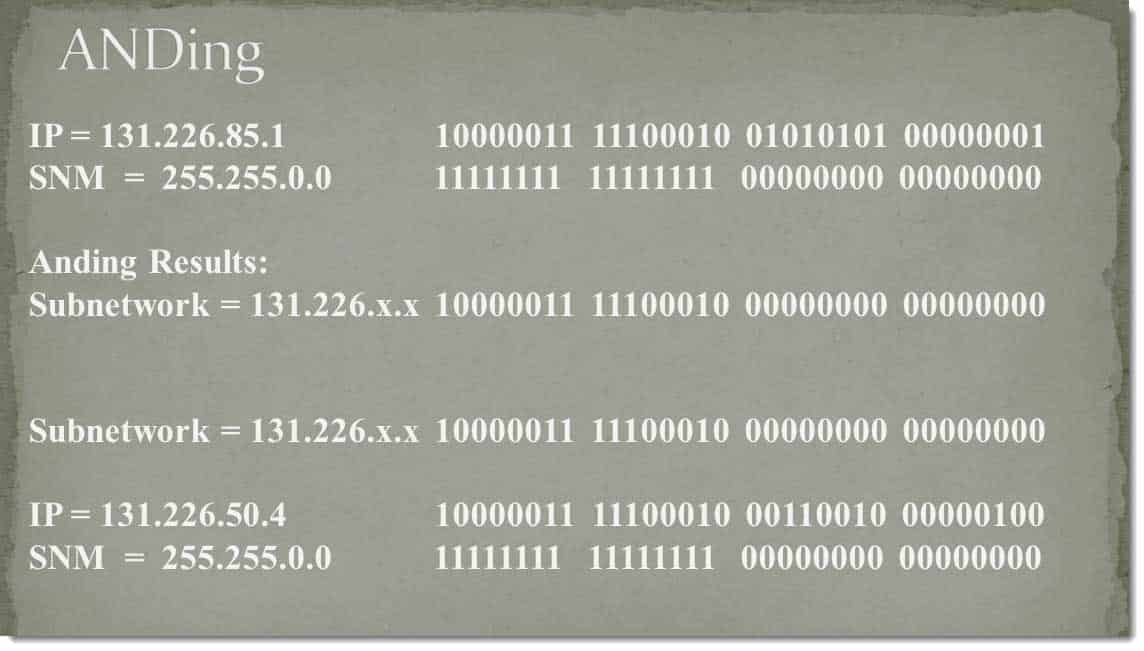
If I take my current IP address of 131.226.85‑1 and I’m going to AND it with my default subnet mask of 255.255.0.0.
If I go across the top, if I do a bit one and one equals a one out, a zero one in equal a zero out, zero one in equals a zero out. They could go all the way across here.
If you did the ANDing, you get an ANDed result of 1000011 1111.00010 and all zeros after that.
The reason why we get all zeros after that and we don’t even have to compute is, in our default subnet mask that’s all zeros.
I then take my destination IP address and I’m going to AND it with the exact same subnet mask. This case of my destination IP address is 131.226.50.4 and I’m going to AND it with, again, 255.255.0.0.
One and one is a one, one and zero is a zero, one and zero is a zero, one and zero is a zero, one and zero is a zero, one and zero is a zero, one in zero is a zero. One and one is one, one and one is one, one and one is one, one and one is one, one and one is one, one and one is one. One and zero is zero, one and zero is zero, one and zero is zero, one and zero is zero, one and one is one, one and zero is zero, and again all the last bits are zero, it doesn’t matter.
I then compare these two values together.
In this case, the results are equal. My destination computer is in the same network segment that I’m in.
What if I make a change? What I change a bit in the last two octets? Let’s make this 51.5. I’m adding a one here and I’m adding a one here.
It doesn’t matter. My subnet mask is zero, it doesn’t change the result.
If I change a bit here,
I make this 227 instead of 226. That makes this bit a one, with that being a one, a one and one is one, that makes this bit now a one.
When I compared the two together, we’re in two separate network segments. IP is, then, going to send this packet off to the router. That’s how ANDing works. Now, we’ve understood ANDing, lets real quick run through an actual subnet problem.
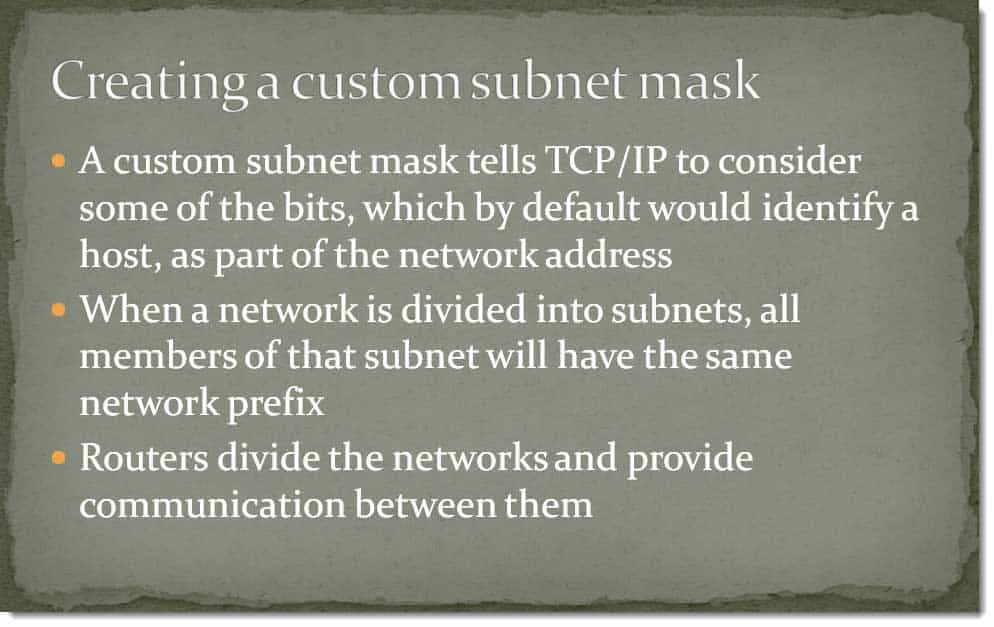
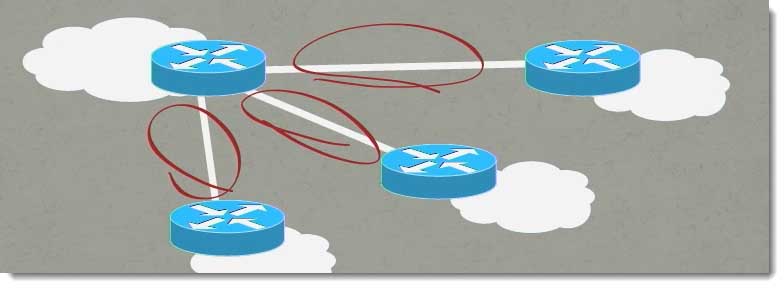
First of all, the process of subnetting is creating a custom subnet mask so that we can create multiple network segments.
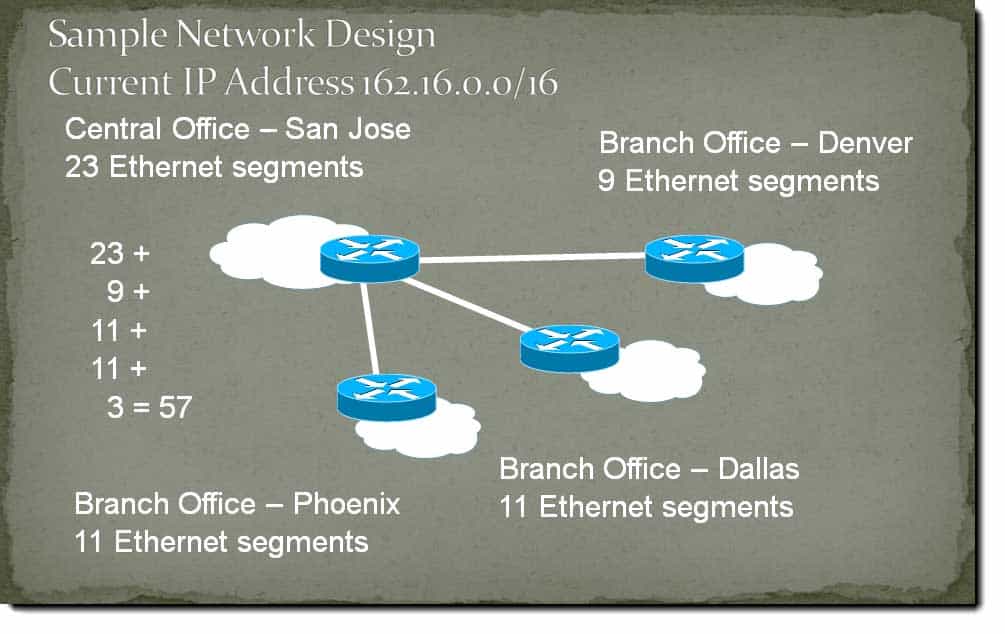
In my example here, we have 162.16.0.0 network with a 16 bits default subnet mask or 255.255.0.0.
I want to cut up my corporate network. The boss has said, “We need the following network segments, we don’t want to use a private IP addressing skin, we want to use our public. We’ve purchased it therefore we want to use it.”
We have 23 network segments in San Jose, we have 9 network segments in Denver, we have 11 network segments in Dallas, and we have 11 network segments in Phoenix. If I were to add all that up, I would come up to 50 network segments.
Management also says, “We want to be able to use these three network segments.
We’re going to divide as part our corporate IP addressing scheme and not being provided by our ISP.”
If I add those in, I end up with a total of 57 network segments.
That’s what corporate wants us to have. When all done, we need to have at least 57 network segments.
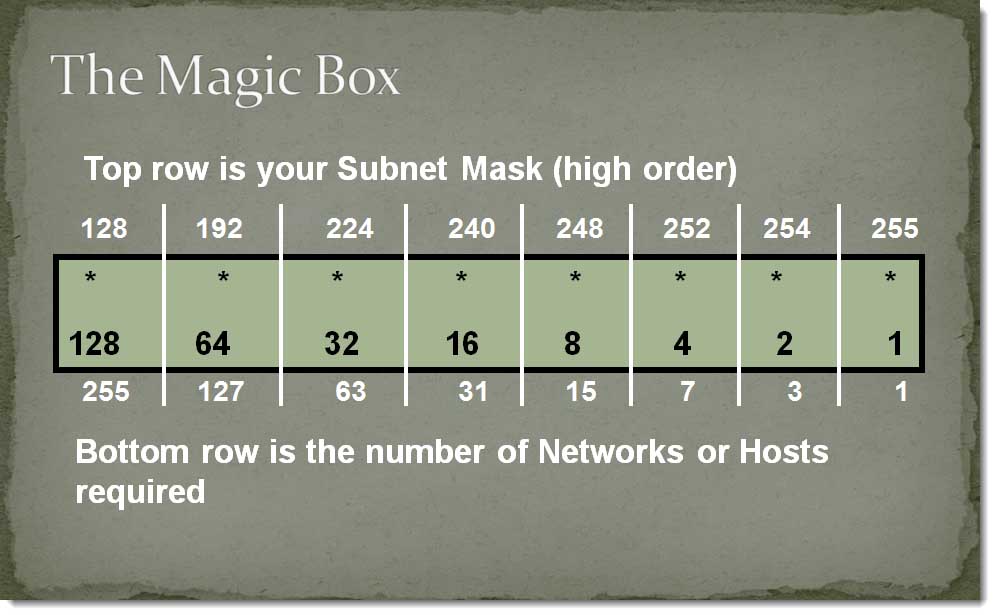
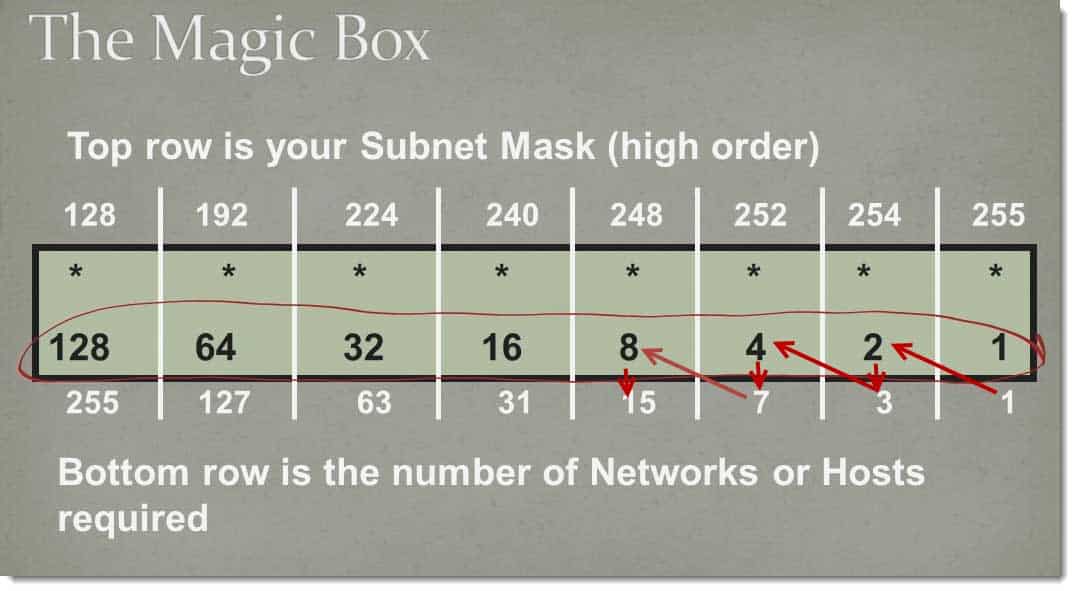
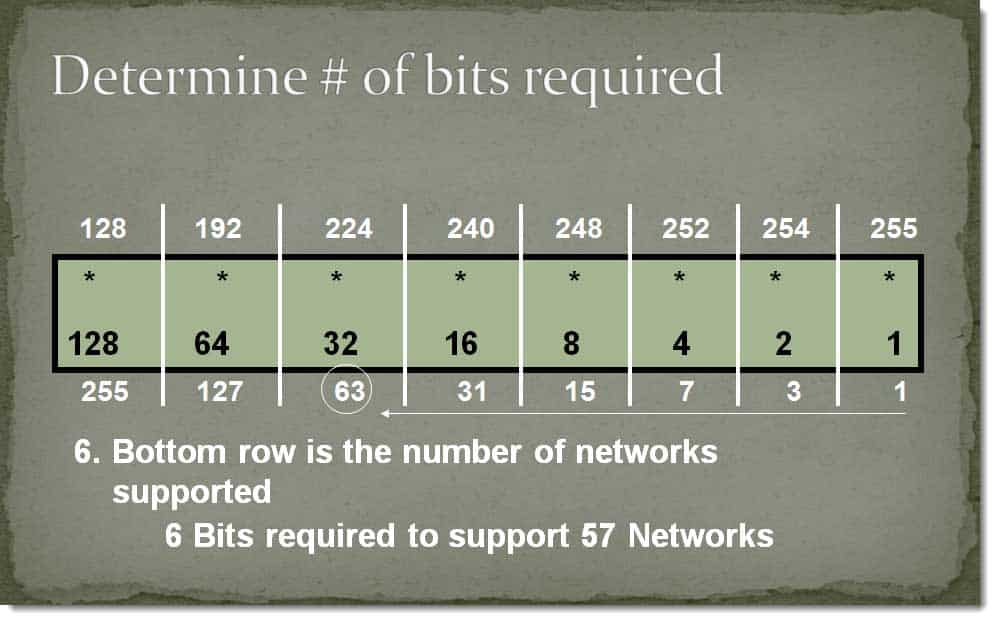
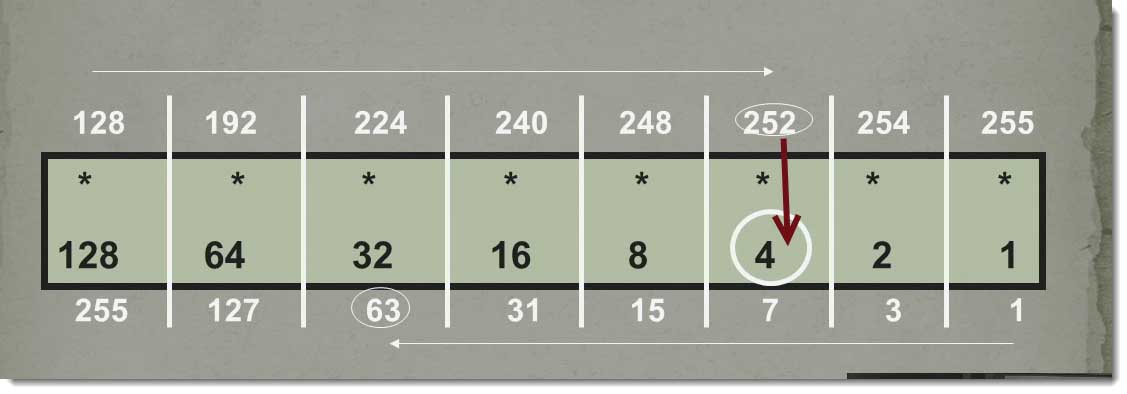
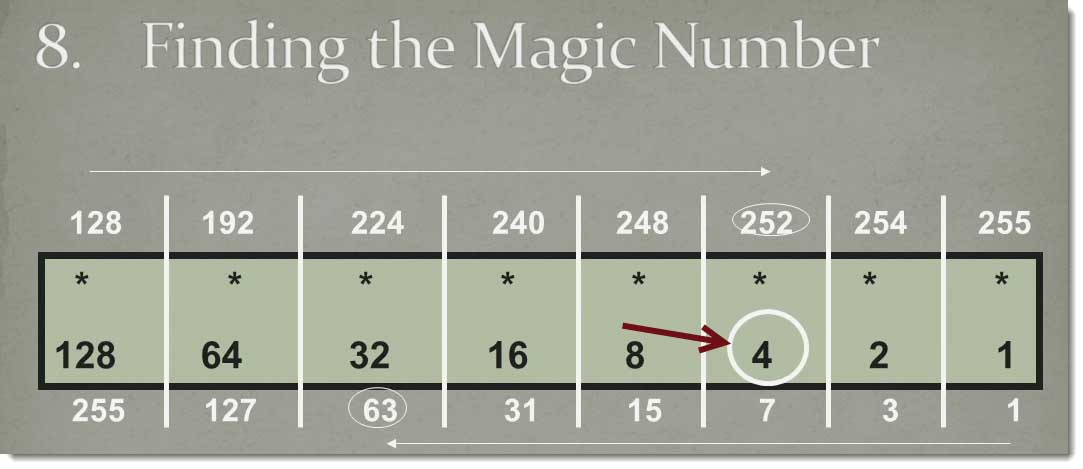
The hardest part about the Magic Box is actually drawing the Magic Box.
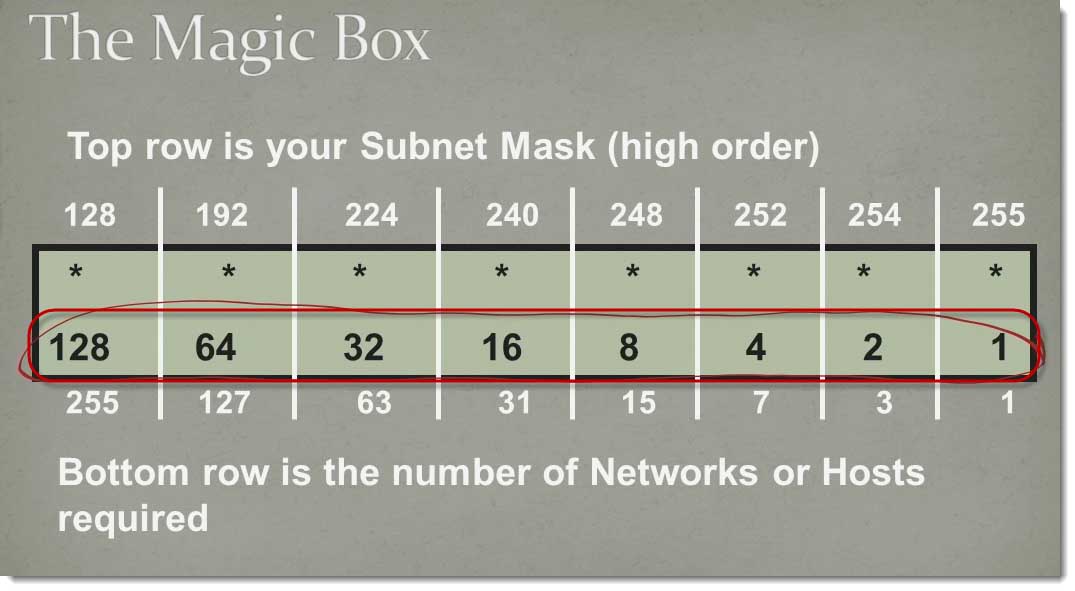
Let me make that a little bit simpler for you. If I go across the middle of the box.
You should recognize these, these are your binary place holders, 1, 2, 4, 8,16, 32, 64, 128. These are your binary placeholders for an 8‑bit binary number. We only have 8‑bits in an octet in IP addressing so that makes it a little bit simpler.
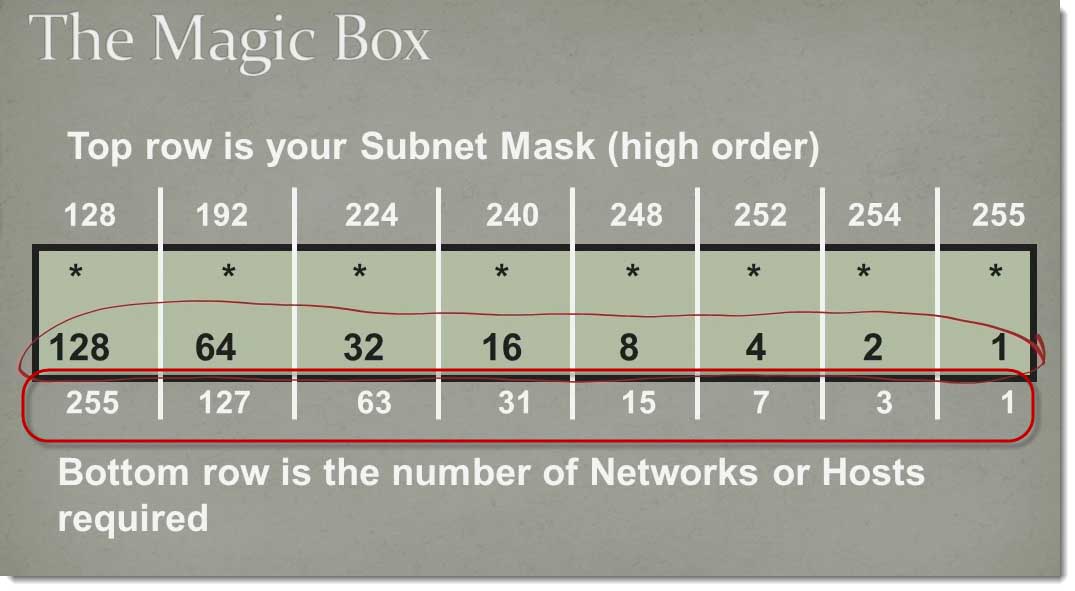
Going across the bottom.
These numbers are going to represent either the number of network segments that are going to be required, or the number of hosts that we’re going to require if we’re doing host per segment instead of network segments.
We can actually do this one of two ways.
If you notice, one is one less than two, three is one less than four, seven is one less than eight, we can do it that way or I can do this, 1 + 2 = 3, 3 + 4 = 7, 7 + 8 = 15, 15 + 16 = 31, and so forth until I get to 127 + 128 = 255.
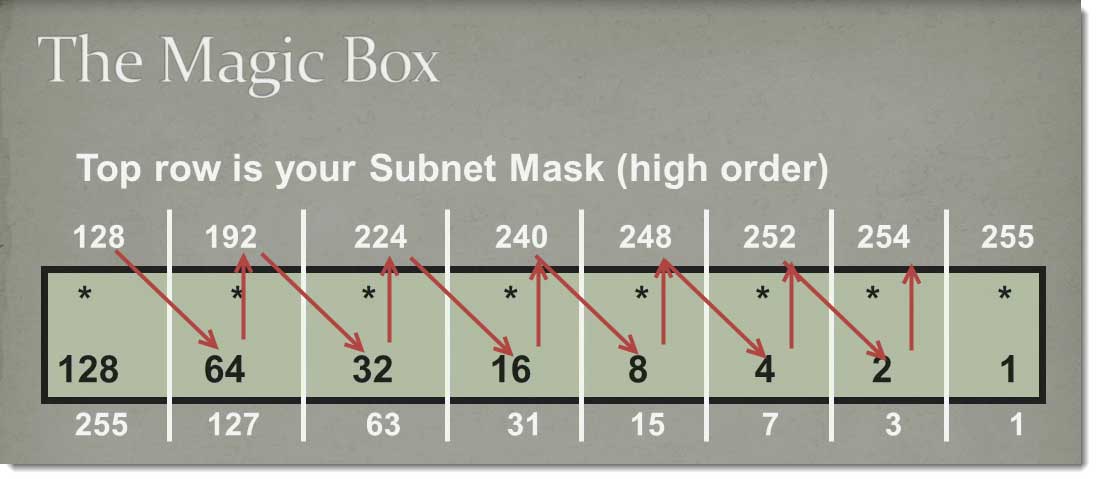
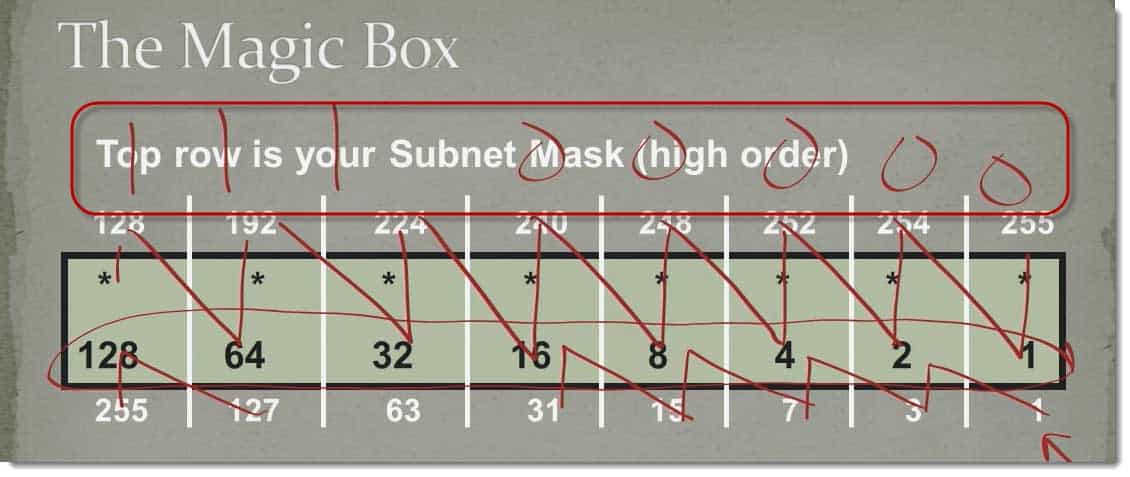
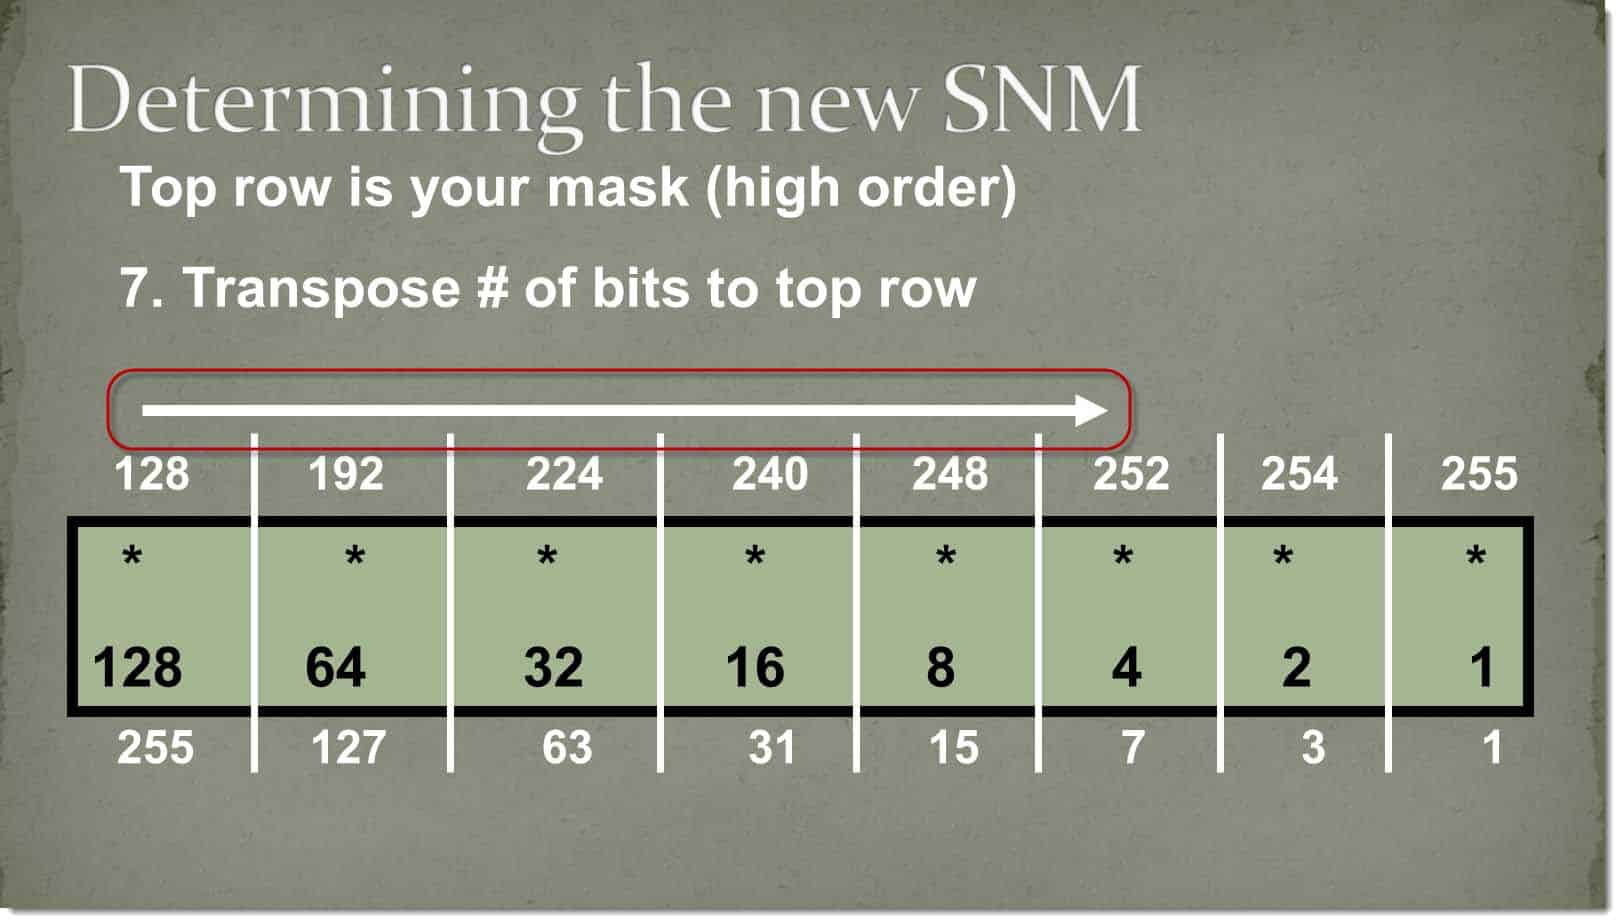
Going across the top is going to represent our new subnet mask, and if you remember how subnet mask work, it always starts with the higher order bits and it’s also going to be contiguous.
If I were to have a logic level-one in this first place holder and the rest were zeroes, that would be a subnet mask of 128.
If I go across the top doing exactly the same as on the bottom, 128 + 64 = 192, 192 + 32 = 224 + 16 = 240 + 8 = 248 + 4 = 252 + 2 = 254 + 1 = 255
The reason why I’m adding this is if you take a subnet mask as an example, let’s say we add a 3‑bit subnet mask.
1, 1, 1, 0, 0, 0, 0, 0 if I took 128 + 192 + 16, and I added these up, this would add up to a 224 subnet mask.
Use whatever way’s the simplest for you for creating this.
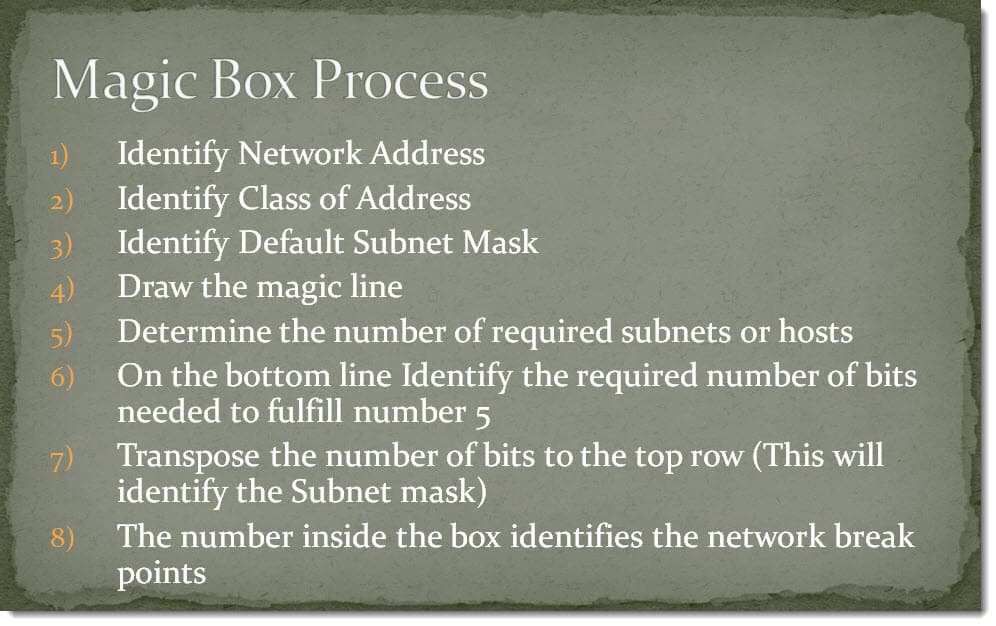
The Magic Box? It’s an eight‑step process.
I will show you each of the eight steps. It’s an eight‑step process. We’ve got it written out here, but let’s go through the actual steps.
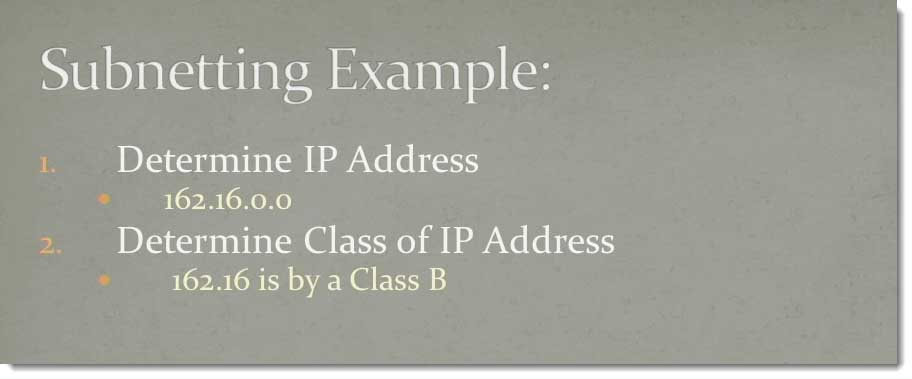
The first step is determined our IP Address. What is our corporate network ID? In this case, our corporate network ID’s 162.16.0.0.
Then identify what the class of the IP is because the class of the IP address is going to determine our default subnet mask. A 162 in the first octet, makes it a class B address.
Keep in mind you should already know what your class of IP addresses are. A 1 to 127 is a Class A, 128 to 191 is a Class B, 192 to 223 is a Class C.
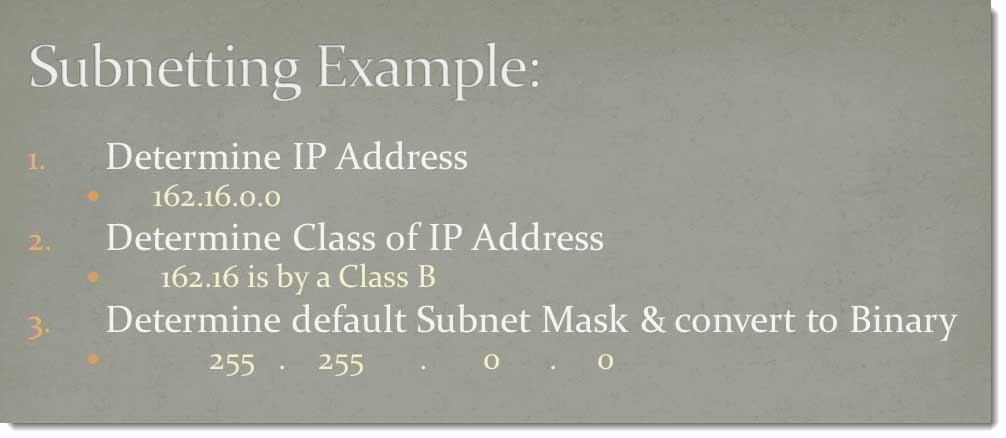
Step number three is to determine the default subnet mask and convert it to binary.
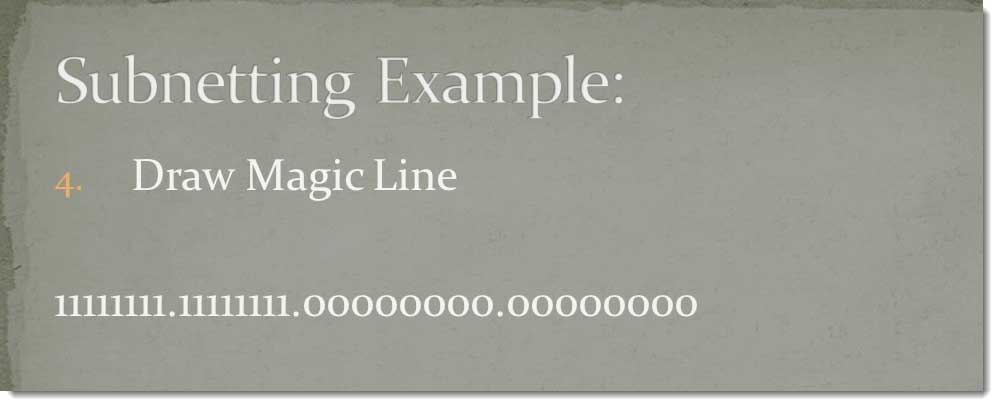
The default subnet mask of a Class B address is 255.255.0.0 which makes the binary, 11111111.11111111.00000000.00000000.
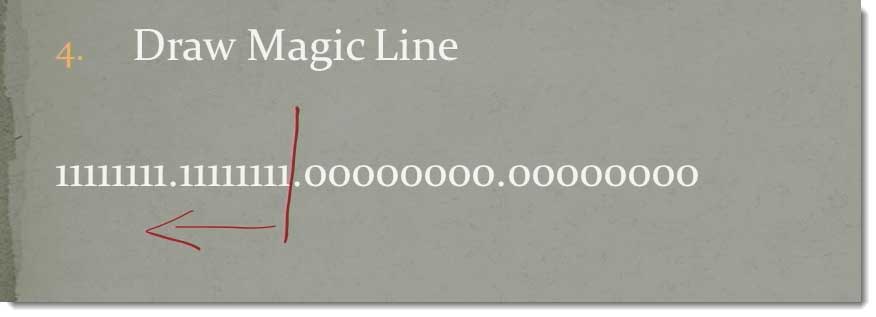
The fourth step is going to draw what’s referred to as the Magic Line.
If I take my subnet mask and I find a break point between the ones and the zeroes, in this case, the breakpoint is right there.
If I were supernetting, I would borrow bits from the actual subnet mask.
Supernetting is when I want to combine two network segments together to give me more hosts.
If I borrow to the right of the line, I’m subnetting.
In other words, I’m borrowing bits from the host to give myself more network segments.
In this case, we’re subnetting, we’re borrowing bits to the right.
Step number five is using from management the required or the desired number of network segments.
In this case, management decided we wanted to have at least 57 network segments.
Now, we go back to the Magic Box and we go to the bottom of the scale.
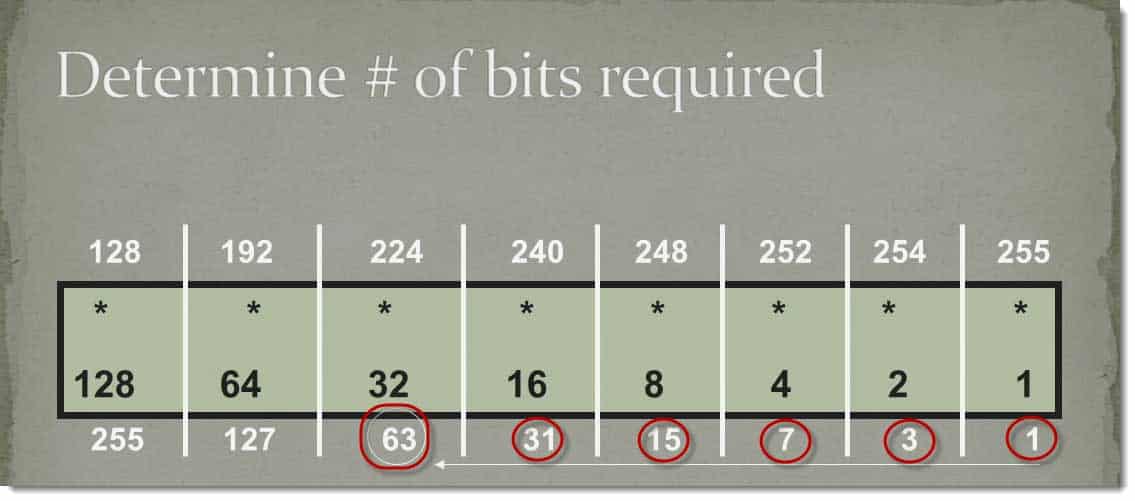
We start at the right‑hand side and we work our way to the left. We continue moving our way to the left until we get to a number that’s either equal to or greater than the number of network segments we require.
In this case, 1 is not greater than, 3 is not greater than, 7 is not greater than, 15 is not greater than, 31 is not greater but all of a sudden, we get to the 63.
63 is either equal to or greater than that required number’s network segments.
In this case, we can have 63 network segments created. We count the number of bits that we require, 1, 2, 3, 4, 5, 6.
We require six bits in our subnet mass in order to have at least 57 network segments, at least 6 bits.
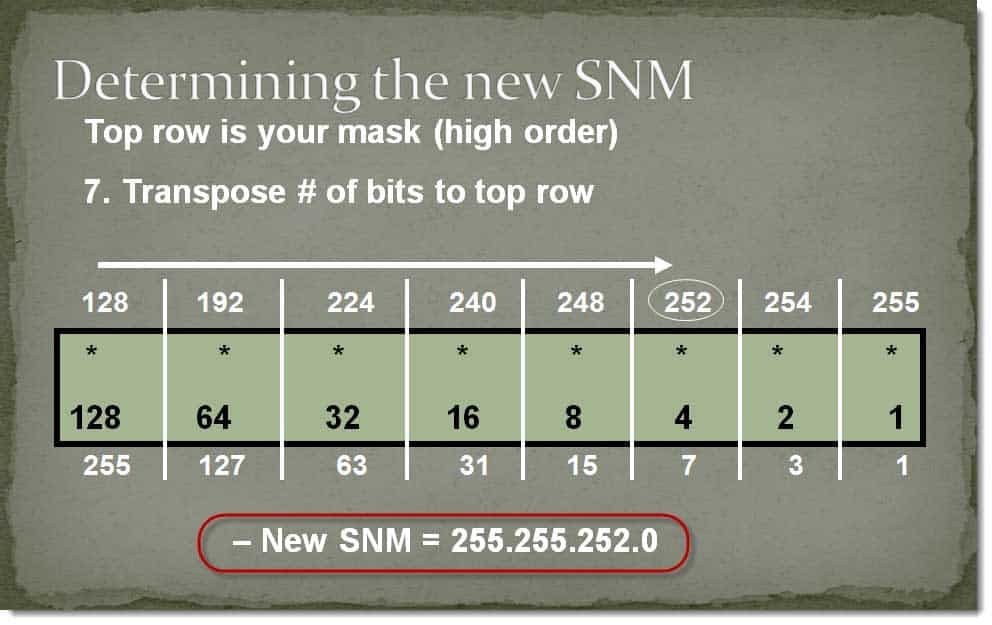
Step number seven, we’re going to transpose those bits to the top. Again, because of the rules of subnetting, our subnet mass will always be higher in the order of bits contiguous from the left, we transpose that to the top, our 6 bits.
We put our six bits in. Our new subnet mass is going to be 255.25.252.0.
That’s our new subnet mass. We have six bits. With that said, we can find what’s referred to as the magic number. I’ll explain what the magic number is here in a second, but I’m going to drop straight down from 252, straight down to the center. 254 becomes what’s referred to as my magic number. In this case, the number 4.
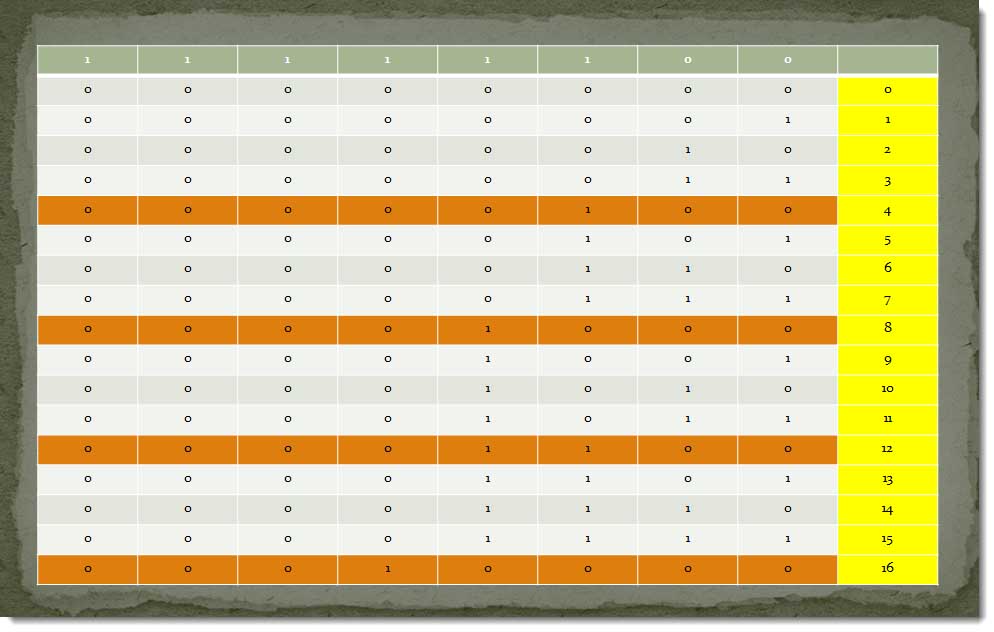
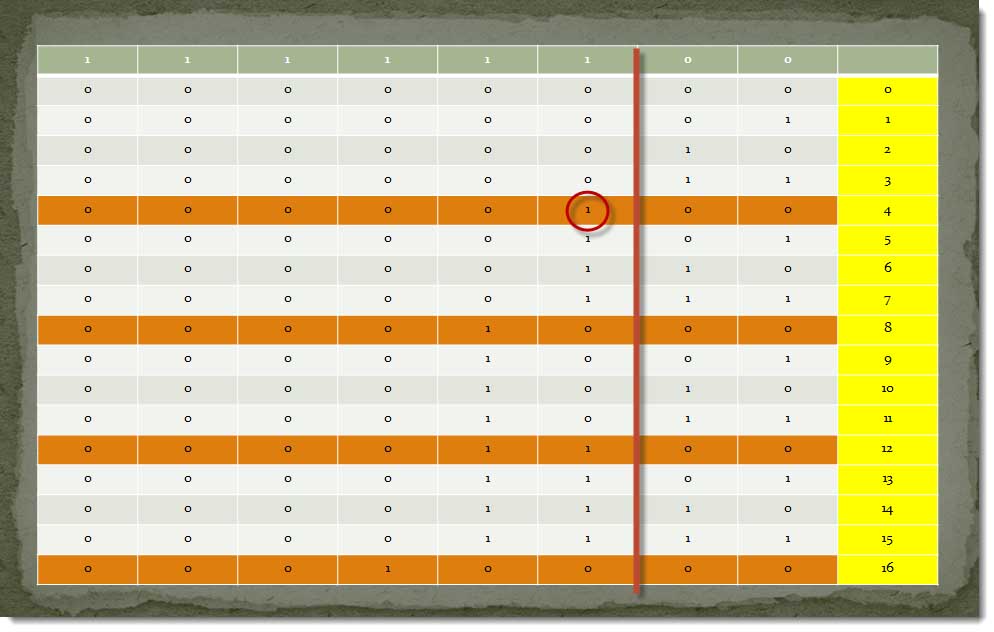
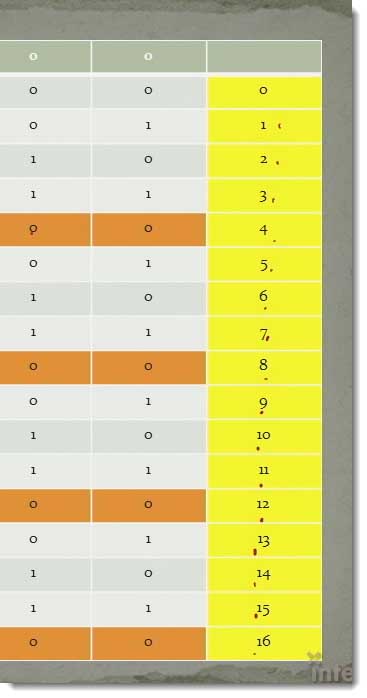
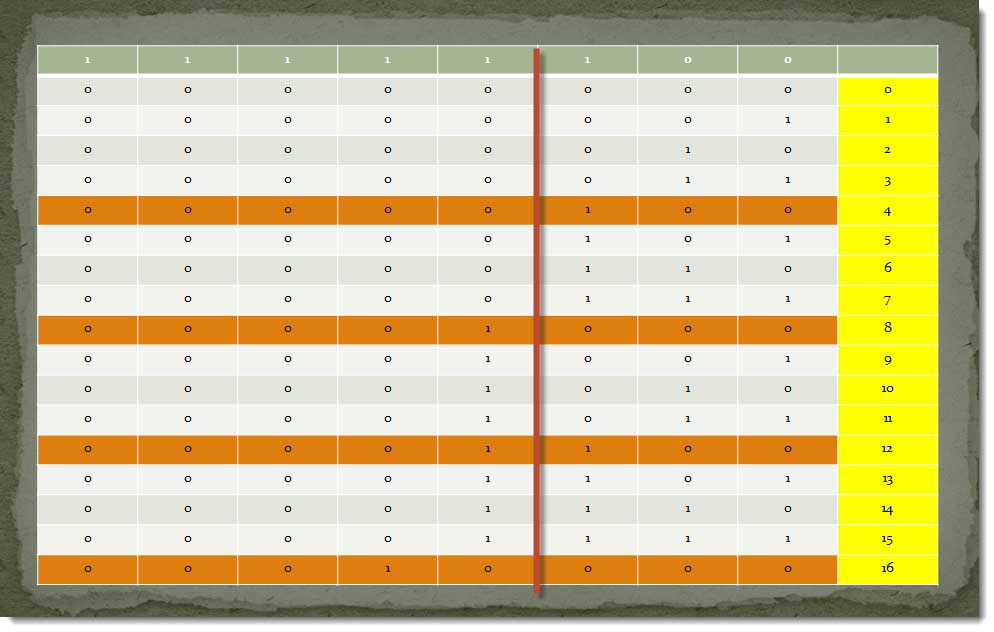
How does all this come into play? I know this might be hard to read, but I wanted to count up binarily from zero to 16 to show you how the subnet mass works.
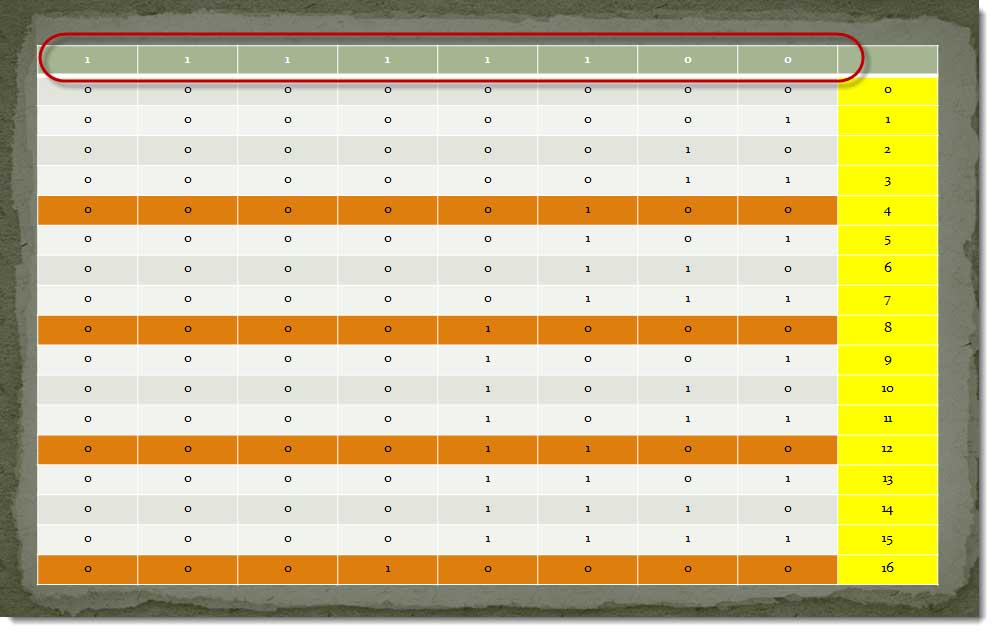
Notice going across the top, I have my 252 representation or 1‑1‑1‑1‑1‑1‑0‑0.
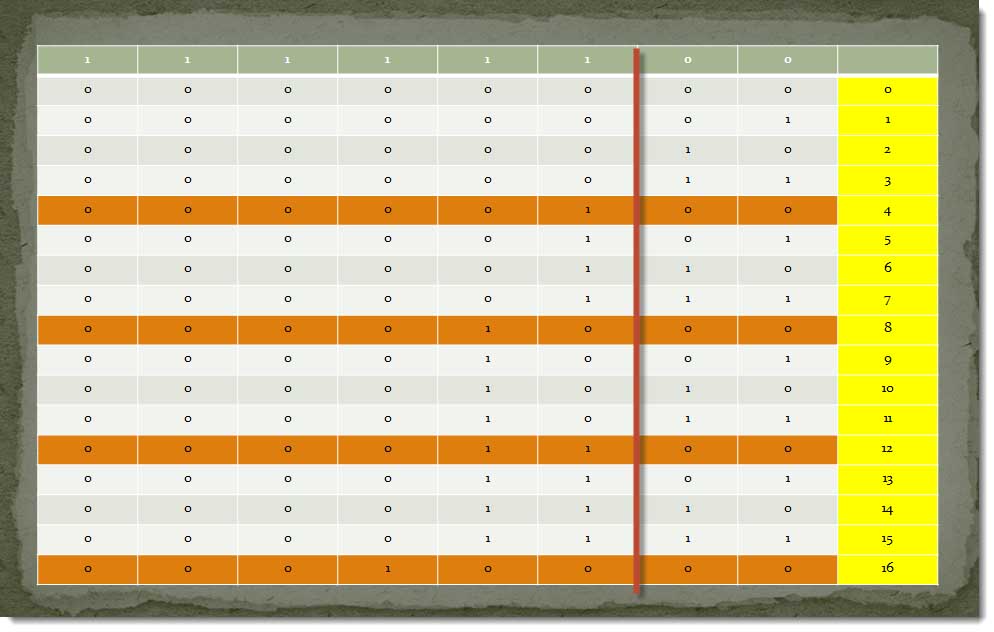
Right here is where that magic line would be.
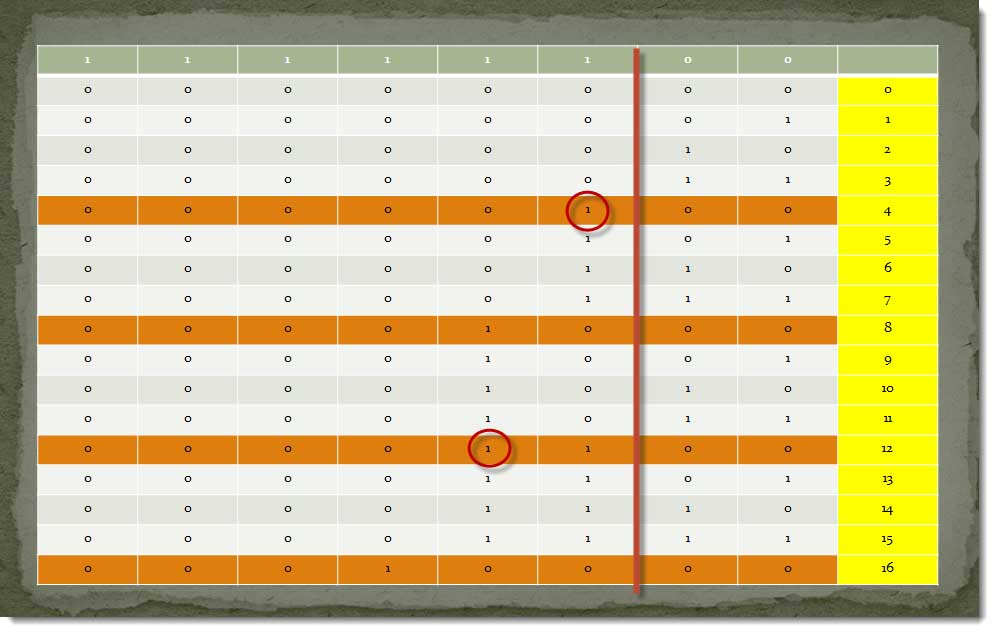
Anytime a bit changes to the left of that line, that’s a new network segment. Here’s how that 4 came into play. If I’m counting up from zero to 16, notice 0‑1 is 1, 1‑0 is 2, 1‑1‑1 is 3. Notice 1‑0‑0 becomes 4.
I just changed the bit to the left of that line. I just went into a network segment. 1‑0‑1 is 5, 1‑1‑0 is 6, 1‑1‑1 is 7, all of a sudden, I just changed a bit. 1‑0‑0‑0 is 8.
To the left of that line, I just went in a new network segment. 1‑0‑0‑1 is 9, 1‑0‑1‑0 is 10, 1‑0‑1‑1 is 11.
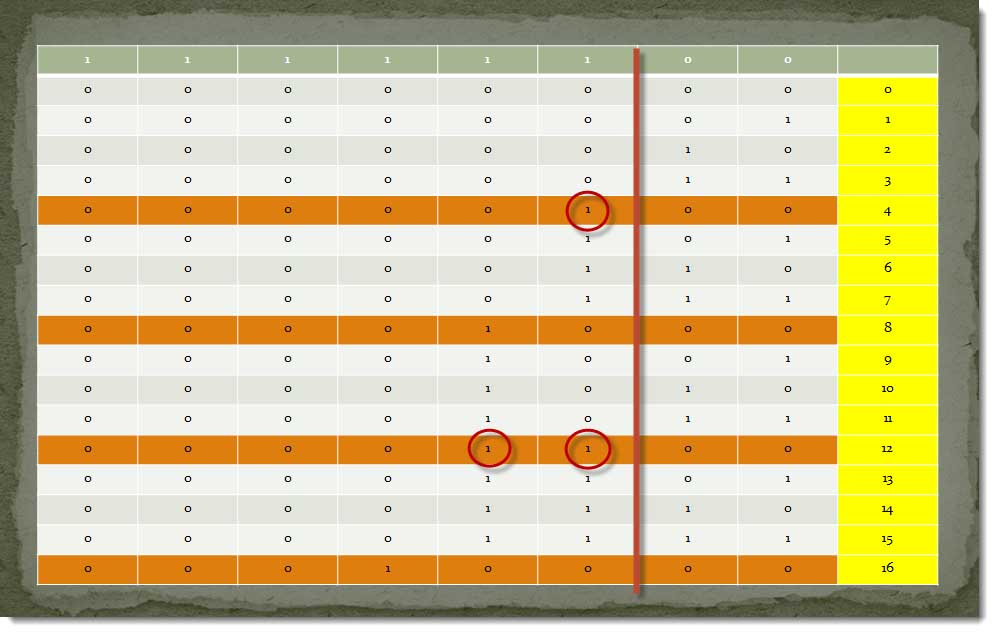
All of a sudden, 1‑1‑1‑1‑0‑0 is 12.
I just changed the bit over here. I just went into a new network segment, but check out this correlation, folks. 1, 2, 3, 4; 1, 2, 3, 4; 1, 2, 3, 4; 1, 2, 3, 4.
Every fourth increment, I’m actually going up to a new network segment. Hence, the 4.
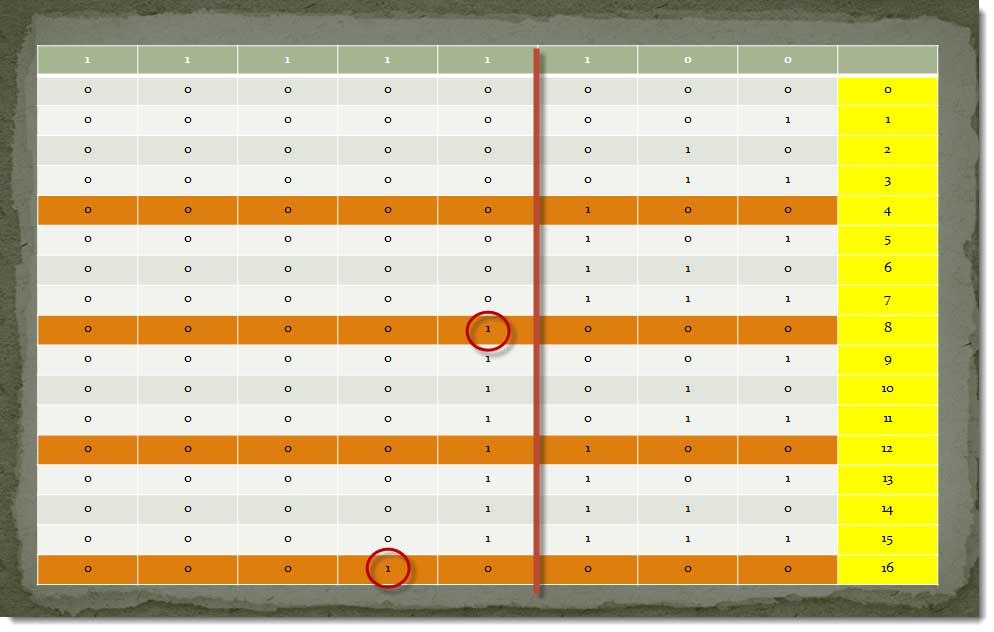
If, by chance, I was using a 248 subnet mass, I’m going to be counting up in vise of eight.
To show you that again, if I come over here that means that my magic line would be now be here.
Which means, all these numbers I don’t change until I get to here. All of a sudden, I change the bit, a new network segment.
The next time I change the bit was down here. 1, 2, 3, 4, 5, 6, 7, 8,
Every eighth one changes. That’s where that magic number comes into play. That is so cool for counting up your segments.
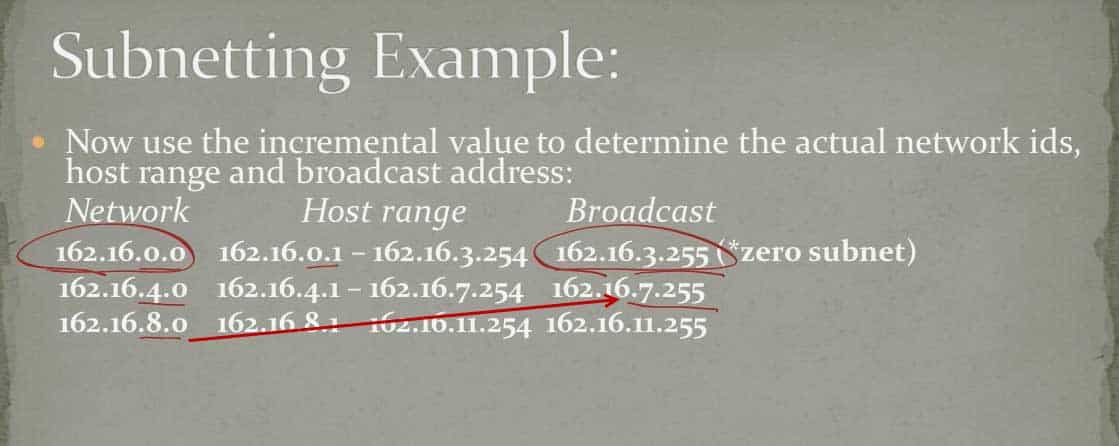
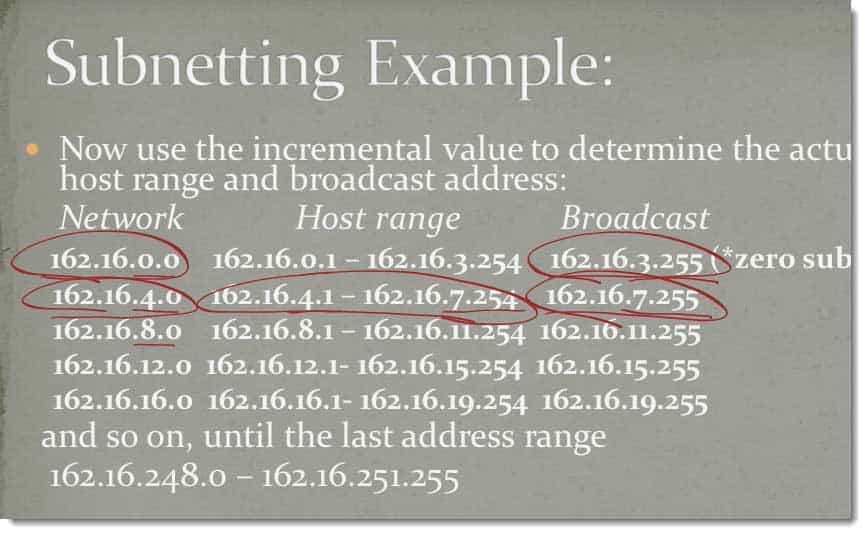
Let’s look at our new network IDs.
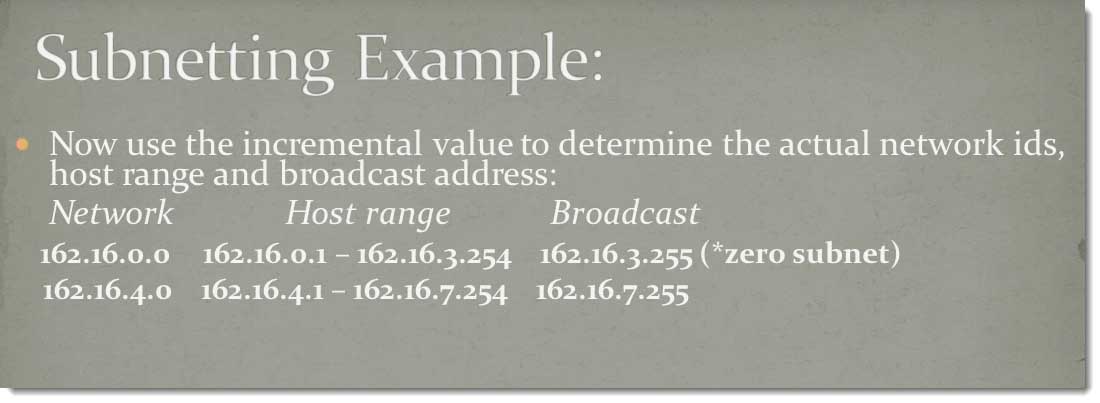
If I come in here and I count up with my network IDs, 162.16.00, the next network is going to be 162.16.4, counting up in 4s, that third octet.
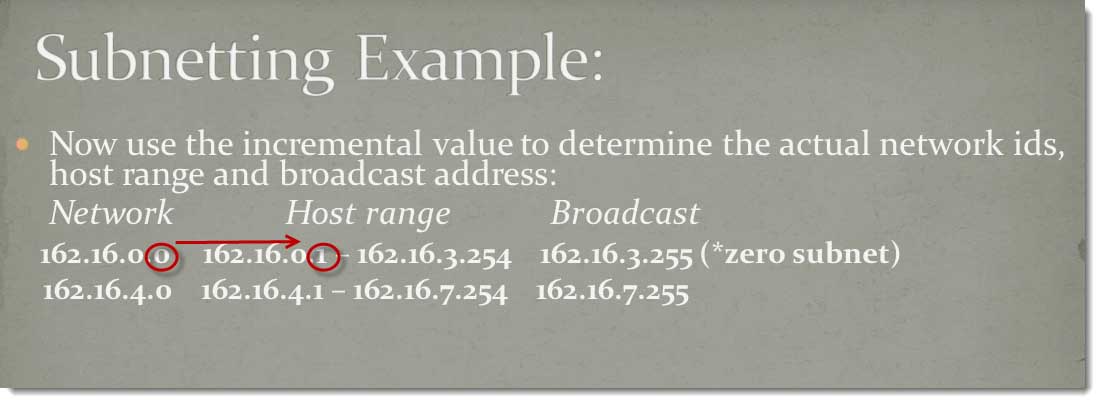
Check this out. This is so cool. 1 greater than this is 0.1.
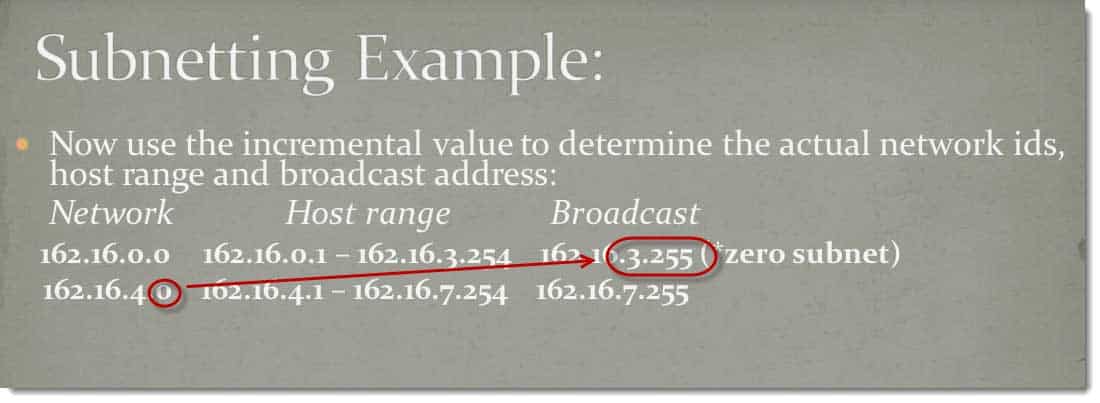
1 less than this one is 3.255.
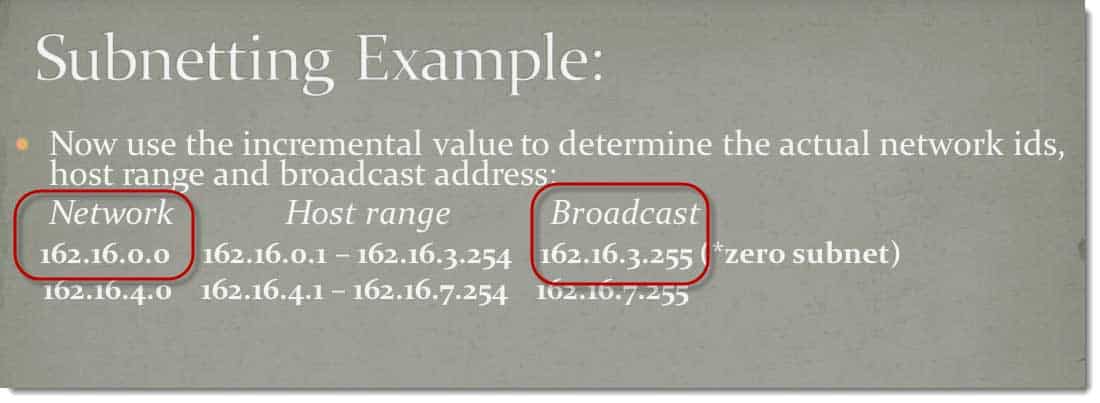
This is the network ID. This is the broadcast ID.
Between those two addresses become legal addresses for this network segment, 0.1 to 3.254.
If I count up one more 4 to 8, increments of 4 based off the magic box, 1 less than 8.0 is 7.255, 1 greater than 4.0 is 4.1, 1 less than 7.255 is 7.254.
Here’s my network ID. Here’s my broadcast ID. All these addresses between there are legal addresses in that segment. I count up to eight, my next segment would be 12, my next segment would be 16.
I continue to count up that way in increments of four until I get to 162.16.248 because my next IP address would be my subnet mass for a total of 63 network segments.
Now, the corporation can expand an additional seven segments if needed over the 57.
What else can we calculate from this?
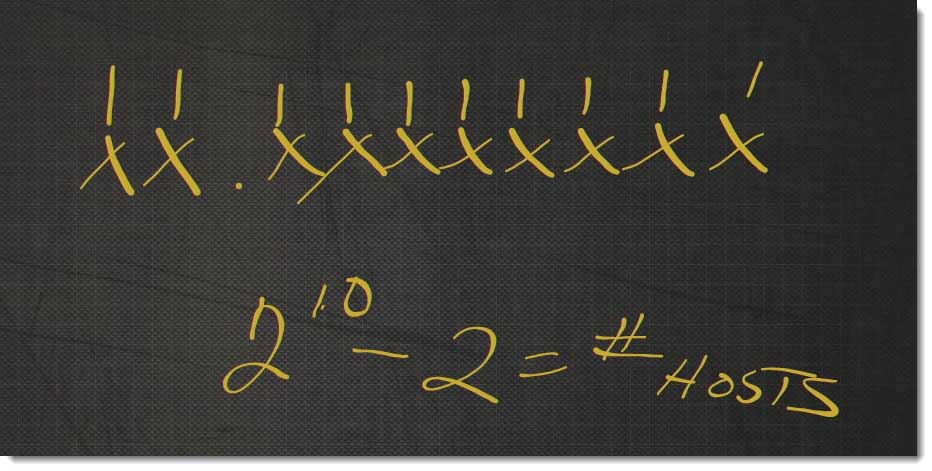
If I have those six bits for my subnet mass that means I have eight bits in the last octet, and I have two bits in the third octet for actual host IDs.
I can calculate the number of hosts.
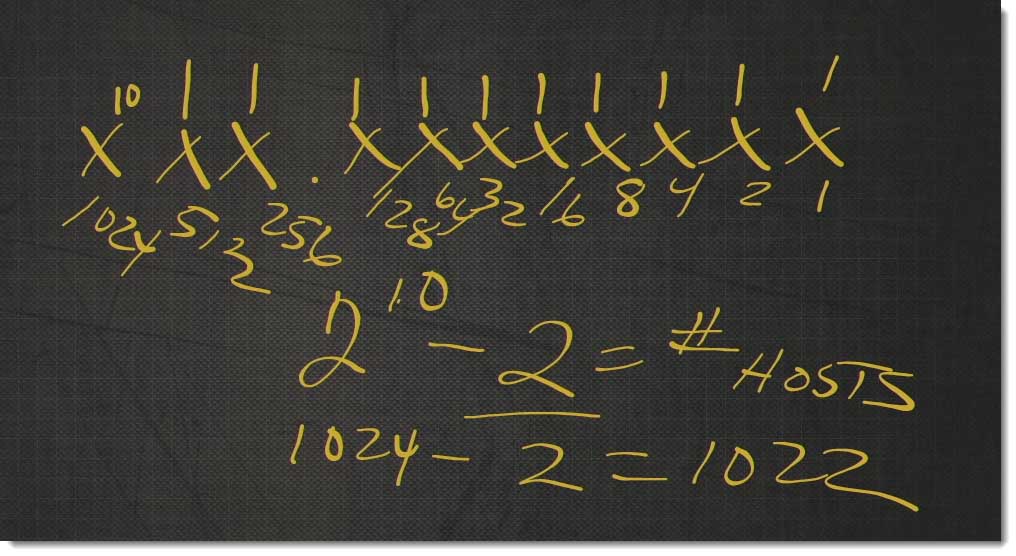
The number of hosts would be, counting the bits, 1, 2, 3, 4, 5, 6, 7, 8, 9, 10. 2^10‑2 equals the number of hosts, you ask yourself, “Why do we subtract 2?”
My host cannot be all 0s. My host cannot be all 1s. All 0s is the network ID. All 1s is the host ID. If I add one more bit, because this is actually 2^10. 2^10 is 1, 2, 4, 8, 16, 32, 64, 128, 256, 512, 1024. 2^10 is 1,024, ‑2=1,022.
I get 1,022 hosts per network segment. That’s how simple it is to subnet using the magic box and then determining the number of hosts. You can do exactly the same thing if you were doing the number of hosts and didn’t care about the number of segments. Like always, until next time, be all right, safe.
You May Also Like
A Simple Introduction to Cisco CML2
0 3914 0Mark Jacob, Cisco Instructor, presents an introduction to Cisco Modeling Labs 2.0 or CML2.0, an upgrade to Cisco’s VIRL Personal Edition. Mark demonstrates Terminal Emulator access to console, as well as console access from within the CML2.0 product. Hello, I’m Mark Jacob, a Cisco Instructor and Network Instructor at Interface Technical Training. I’ve been using … Continue reading A Simple Introduction to Cisco CML2
Creating Dynamic DNS in Network Environments
0 649 1This content is from our CompTIA Network + Video Certification Training Course. Start training today! In this video, CompTIA Network + instructor Rick Trader teaches how to create Dynamic DNS zones in Network Environments. Video Transcription: Now that we’ve installed DNS, we’ve created our DNS zones, the next step is now, how do we produce those … Continue reading Creating Dynamic DNS in Network Environments
Cable Testers and How to Use them in Network Environments
0 752 1This content is from our CompTIA Network + Video Certification Training Course. Start training today! In this video, CompTIA Network + instructor Rick Trader demonstrates how to use cable testers in network environments. Let’s look at some tools that we can use to test our different cables in our environment. Cable Testers Properly Wired Connectivity … Continue reading Cable Testers and How to Use them in Network Environments











See what people are saying...