In Part 1 of this series (Installing Active Directory Domain Services – Establishing an AD DS Forest in Windows Server – Part 1) I wrote on how to establish an Active Directory Forest.
This is Part 2. In this blog we will explore how to add a child domain to an existing AD DS Forest.
In Part 3 (Installing Active Directory Adding a child domain to an existing Active Directory Domain Services Forest in Windows Server – Part 3) we will be adding a second tree to the forest.
The Active Directory Domain Services (AD DS) design team has finished the design phase for your new AD DS environment and now it is time to implement the new child domain. Using Microsoft’s best practices the Domain Name System (DNS) will be installed in the forest root domain and configured to support our new domain. To following steps have been accomplished:
- DNS has been installed
- A new Forward Lookup and Reverse Lookup Zones allowing both Secure and Non-Secure Dynamic Updates were created.
- A static IP Address was configured with the DNS entry pointing to its own address.
- On the server that AD DS will be installed on the properties sheet the DNS suffix has been modified to represent the new AD DS Domain name and the computer restarted.
- After the computer has restarted verify the host has registered it A and Pointer records in DNS. (see diagram below)

Now that DNS is configured to support AD DS we can begin the installation.
The Local Administrator account should have a strong password as it will become the first Administrator of the Domain and will be automatically added to the following groups: Administrators, Domain Admins, and Group Policy Creators Owners.
To install AD DS complete the following steps:
Use DCPROMO to add the Active Directory Domain Services Role to install the Binaries to support this server becoming a Domain Controller.
Note: In the first of the series I used Server Manager to install the AD DS Role in order to install the AD DS Binaries required to promote the server to a domain controller.
1. In the Search programs and files box type DCPROMO press Enter.

2. The server will conduct a check to ensure the Binaries are installed.

Note: If the Binaries were not pre-installed, DCPROMO will install them.

Note: The Binaries are now installed on the server to support this server becoming a Domain Controller. Continue using DCPROMO to promote this computer to a Domain Controller.
3. On the Welcome screen, click Next.
Note: If establishing a separate Tree in the Forest or creating a Replica Domain Controller from alternate location and be sure to check the Use advanced mode installation.

4. Review the Operating System Compatibility page, click Next.

5. On the Choose a Deployment Configuration sheet, select the Existing forest and Create a new domain in an existing forest radial buttons, click Next.

6. Enter the Fully Qualified Domain Name for the parent domain. For this demonstration I will be USSHQ.Local.

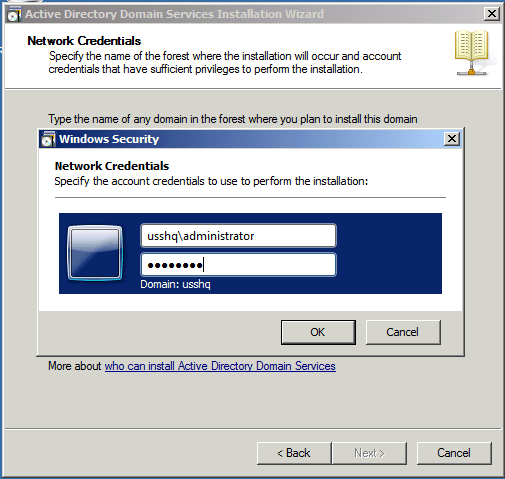
7. To create a child domain requires Enterprise Administrator credentials. Click Set to provide Alternate credentials. After entering the credentials click OK then Next.

8. On the Name the New Domain page enter the FQDN of the parent child domain and the name of the child domain in the appropriate boxes. In this example I will be using USSHQ.Local for the parent domain and Arizona for the single-label name for the child domain.

9. The AD DS Installation Wizard will verify the FQDN is unique, the Netbios name and validity of the Forest.
10. Set Domain Functional Level based on the AD DS design team’s instructions, click Next.

Note: Based on your Forest Functional Level setting the options for the Domain Level will vary.
11. If more than one site were available on the Select a Site you could select a site to place the domain controller object.

Note: If more than one site were defined in AD DS the site that corresponds to the IP Address of the server would automatically have been selected.
12. The AD DS installation wizard will now examine the current DNS configuration.

13. On the Additional Domain Controller Options screen, click Next.

Note: If you desired this new domain controller to be a DNS server or a Global catalog server then check the appropriate boxes. The ROCD option is greyed out because there is currently only one site defined in A DS.
Note: If you choose not to install DNS on the first domain controller in the child domain, a dialog box will require to click confirm you do not desire DNS on the server. Click Yes to continue.
14. On the Location for Database, Log Files and SYSVOL sheet, click Next.
Note: If space or performance were concerned the files would be placed on a separate drive.

15. Enter a Restoration Password, click Next.
This password will be used when restarting the sever in Directory Services Restore Mode.

16. Verify your installation setting on the summary page, click Next.
Note: To create an unattended installation file click the Export setting button before clicking next.

Note: The Active Directory Domain Services Installation Wizard will not install and configure AD DS based off your entries. The progress can be viewed from the dialog box in the middle of the screen.
17. Click Finish, then Restart Now to restart the server. Once restarted AD DS is installed and your AD DS Forest has been established.

Verifying the installation of AD DS
1. Logon to the Domain Controller using the Administrator account credentials.
2. Launch the DNS console and verify the creation of Service Records for the newly established AD DS Forest. Below is an expanded view of the new DNS structure.

Your child domain with AD DS is now installed. In the next part we will examine creating a second tree in an existing forest. Until then, RIDE SAFE!
Rick Trader
Windows Server Instructor – Interface Technical Training